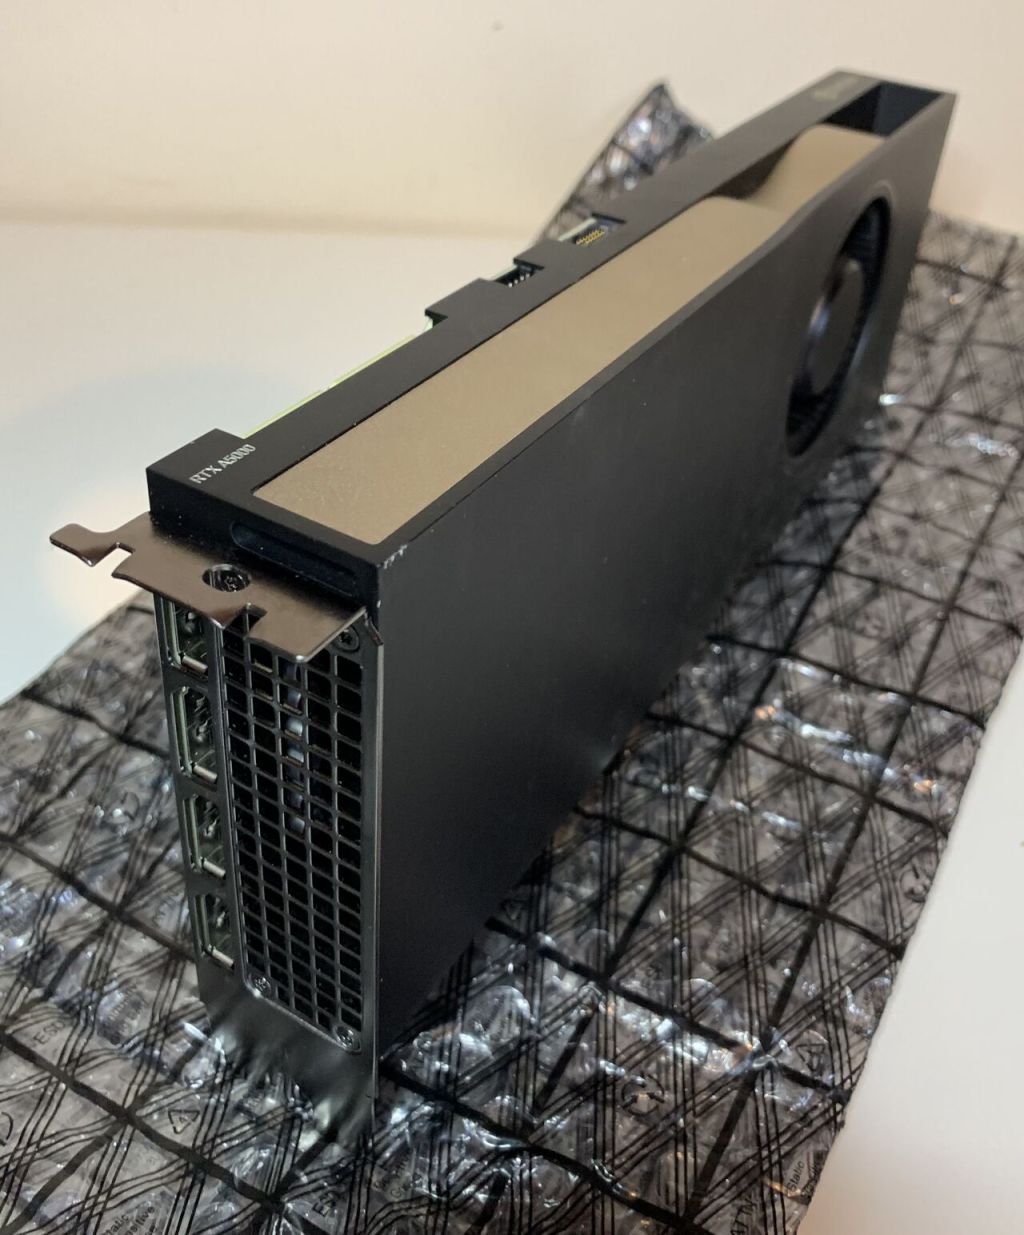
In this post, I’ll walk you through how to use the NVIDIA Display Mode Selector Tool to disable the physical display ports on NVIDIA GPUs. I’ll be demonstrating this on a VMware ESXi host, passing the GPU through to a virtual machine (VM) and using that VM to change the display mode of an NVIDIA RTX A5000 GPU.
- What is the NVIDIA Display Mode Selector Tool?
- Why would you need to do this?
- Getting NVIDIA Display Mode Selector Tool
- Server Configuration (BIOS)
- VMware Configuration
- Disable the physical display ports
- Troubleshooting
- Conclusion
What is the NVIDIA Display Mode Selector Tool?
The Display Mode Selector Tool allows you to configure the physical display output mode of NVIDIA GPUs—i.e. whether the physical display ports are enabled or disabled.
WARNING
Changing the configuration of the physical display ports, such as enabling or
disabling them, should only be performed if a particular use case absolutely requires it since this alters its fundamental behavior in the system. If modified incorrectly or used on an incompatible system, this can cause the GPU PCle board and system to be permanently unusable.
Why would you need to do this?
Some NVIDIA GPUs support both display-off and display-enabled modes. However, they must be in display-off mode to be used with NVIDIA vGPU software. If not set correctly, the GPU won’t be usable with vGPU.
From the latest vGPU documentation (v18.4), the default display modes for several GPUs are:
| GPU | Mode as Supplied from the Factory |
|---|---|
| NVIDIA A40 | Display-off |
| NVIDIA L40 | Display-off |
| NVIDIA L40S | Display-off |
| NVIDIA L20 | Display-off |
| NVIDIA L20 liquid cooled | Display-off |
| NVIDIA RTX 5000 Ada | Display enabled |
| NVIDIA RTX 6000 Ada | Display enabled |
| NVIDIA RTX A5000 | Display enabled |
| NVIDIA RTX A5500 | Display enabled |
| NVIDIA RTX A6000 | Display enabled |
Virtual GPU Software User Guide – NVIDIA Docs
TIP
A GPU that ships with display-off mode, like the NVIDIA A40, may have been changed to display-enabled mode. Always verify.
At the time of writing, only the GPUs listed above support the Display Mode Selector Tool. Other GPUs that support NVIDIA vGPU do not support this tool and do not require display mode switching.
Getting NVIDIA Display Mode Selector Tool
Download the NVIDIA Display Mode Selector Tool from NVIDIA’s website. You’ll need to sign up for a free NVIDIA Developer Account to access the download and accept the warnings.
The NVIDIA Display Mode Selector Tool is compatible with the following operating systems and hypervisors:
NVIDIA-Display-Mode-Selector-Tool-User-Guide_v08_Feb24.pdf
o Windows® version 10 64-bit RS5 or later
o Linux 64-bit
Server Configuration (BIOS)
If you’re using GPUs based on the NVIDIA Ampere architecture or newer, ensure the following BIOS options are enabled:
- VT-D/IOMMU
- SR-IOV
- Memory Mapped I/O above 4 GB
- Alternative Routing ID Interpretation (ARI)
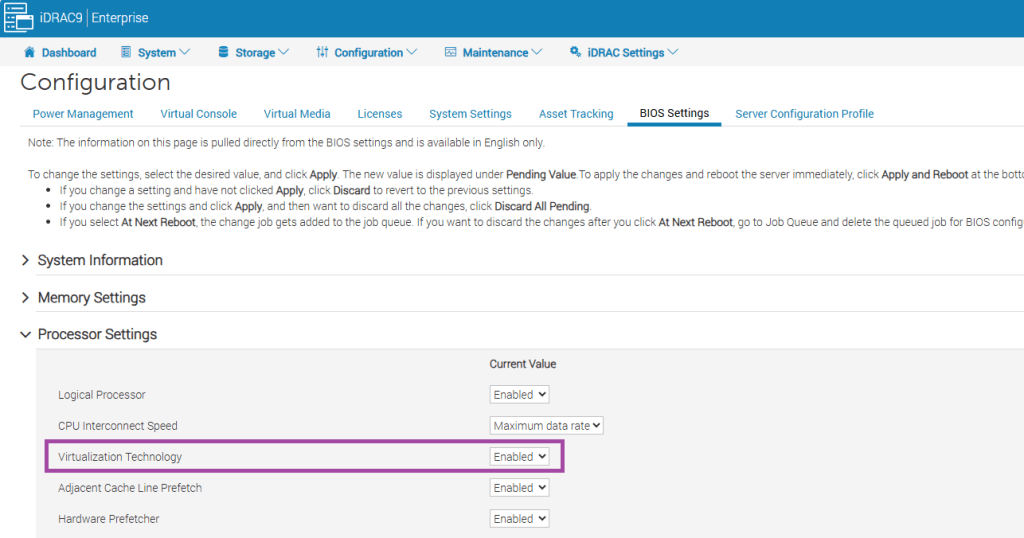
Here’s how I configured the BIOS on my Dell PowerEdge R740:
Tip
These are all BIOS Settings found under Configuration.

Step 1 – Enable VT-D/IOMMU
- Go to Processor Settings
- Enable Virtualisation Technology
Step 2 – Enable SR-IOV
- Under Integrated Devices, enable SR-IOV Global Enable
- Click Apply
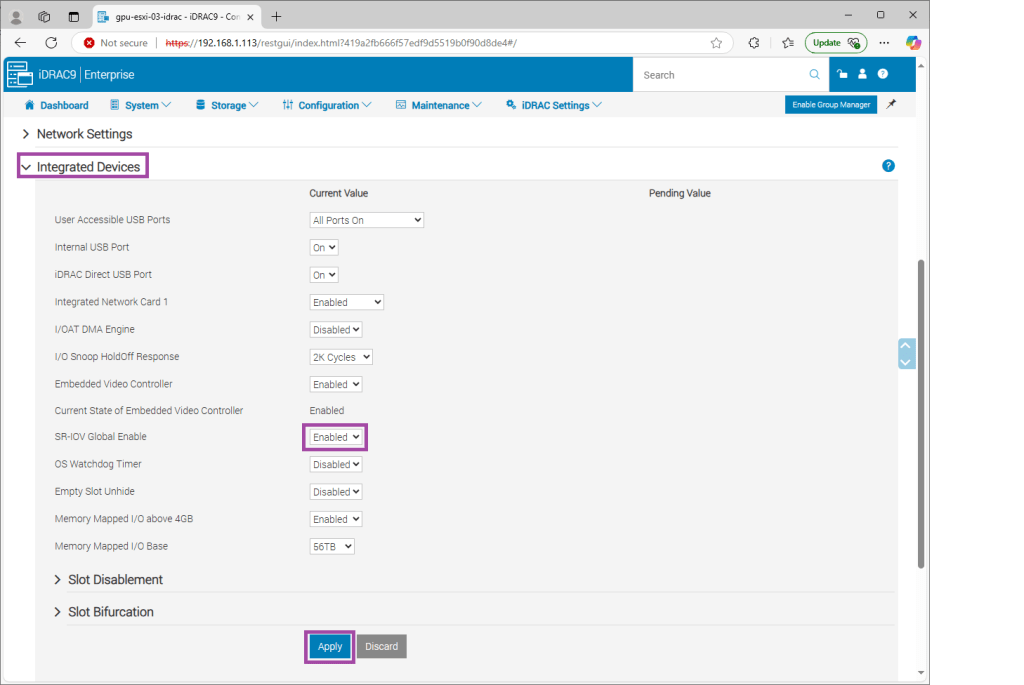
- After clicking Apply, changes will show under Pending Value
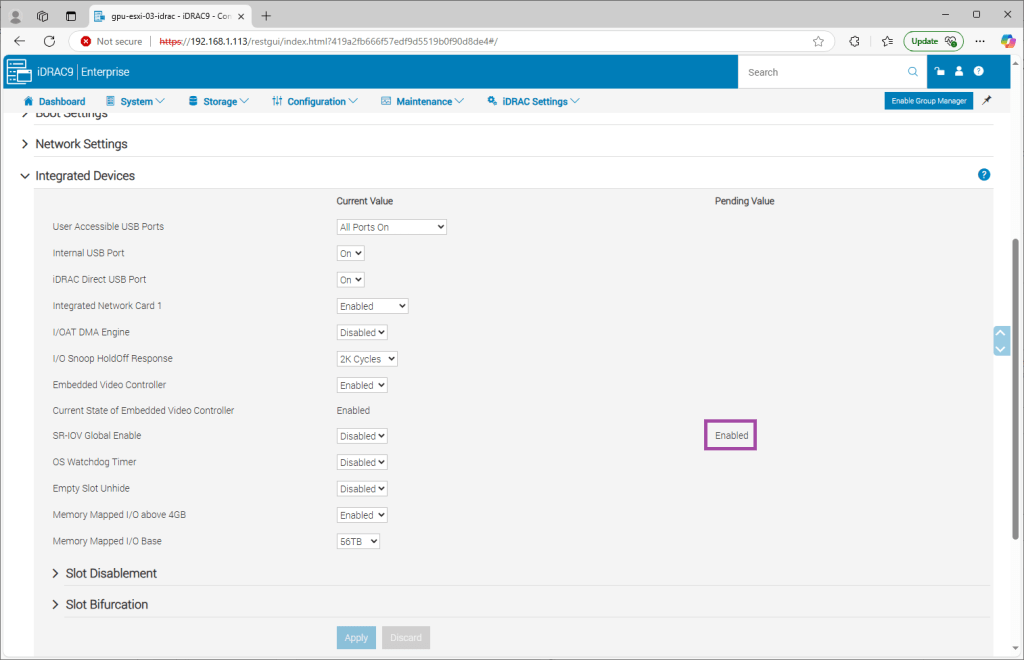
- Choose Apply and Reboot or At Next Reboot

Step 3 – Enable Memory Mapped I/O above 4GB
- Under Integrated Devices, enable Memory Mapped I/O above 4 GB
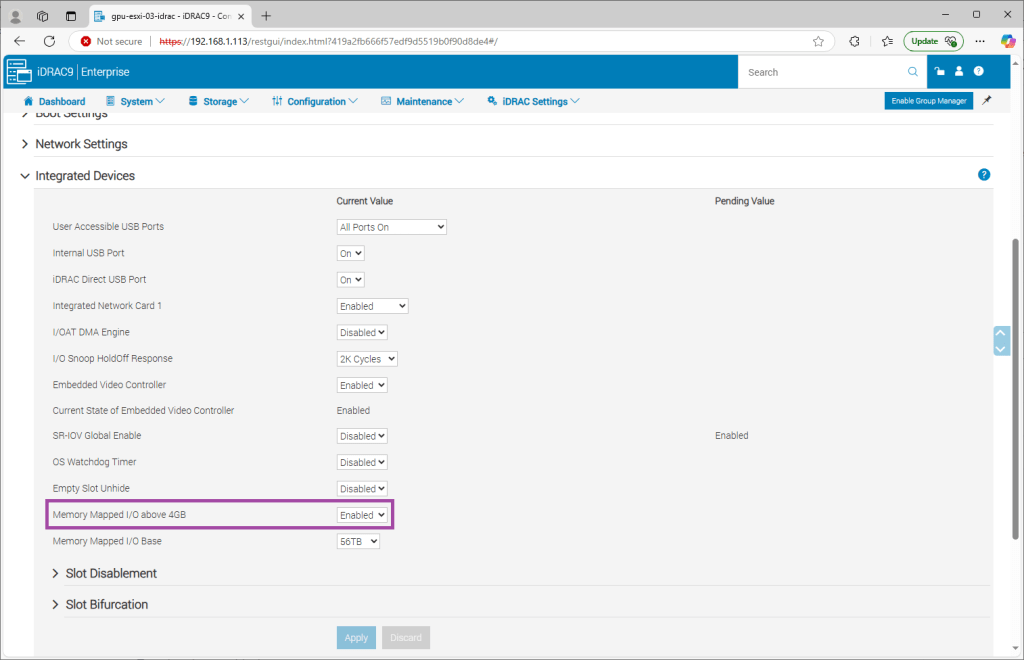
TIP
Apply all changes together using Apply and Reboot to avoid multiple restarts.
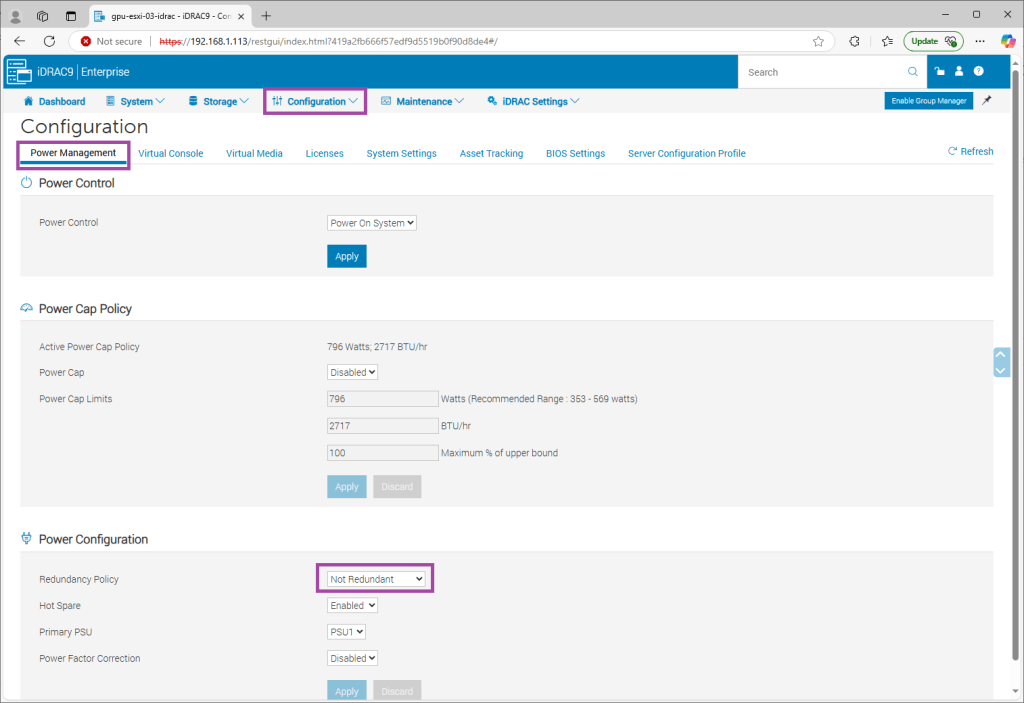
Step 4 – Configure Power Policy for GPUs
Refer to your server’s documentation. For the Dell R740:
NOTE: When using systems with GPU, ensure that you install PSUs with 1100 W or higher, and set the PSU configuration to non-redundant mode.
Dell PowerEdge R740 Installation and Service Manual | Dell UK
VMware Configuration
We’ll now configure the GPU for passthrough, attach it to a VM, and set the necessary options to support large MMIO.
Step 1 – Enable GPU Passthrough
- In the vSphere Client, select the host that contains the GPU
- Browse to Configure -> Hardware -> PCI Devices -> All PCI Devices
- Filter by Vendor Name: NVIDIA
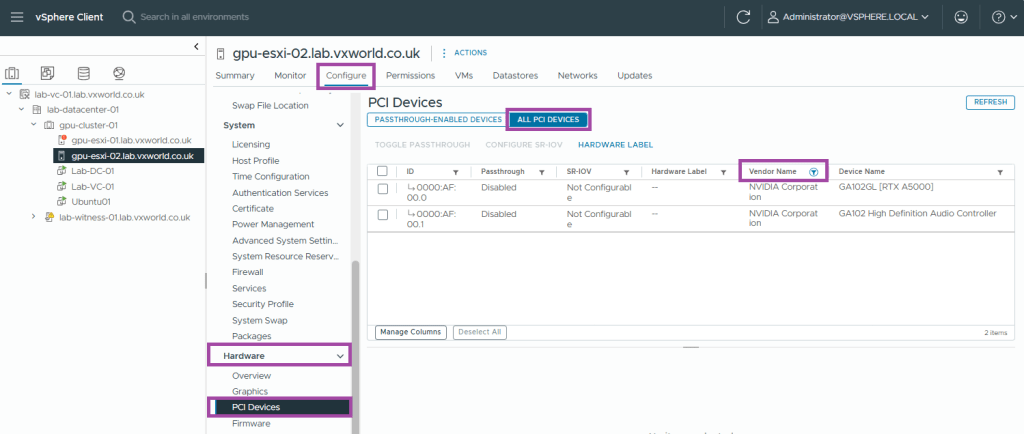
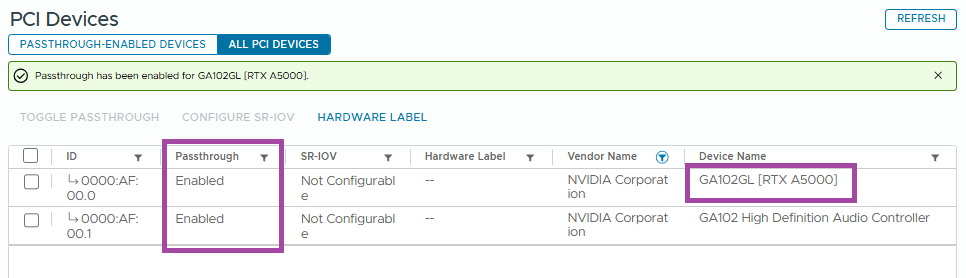
- Select the GPU and click Toggle Passthrough

- The status should now read Enabled
Note
Enabling passthrough for the GPU may also enable passthrough for its audio device.
Step 2 – Create a VM and install an OS
Create a VM and install your OS (I used Ubuntu 24.04). If your GPU has large BAR memory, ensure the following:
- 64-bit guest OS is installed
- 64-bit MMIO is enabled for the VM
- EFI boot must be enabled if BAR1 memory exceeds 256 MB
- Secure Boot must be disabled
TIP
VMware’s blog post “Using GPUs with Virtual Machines on vSphere – Part 2: VMDirectPath I/O” is an excellent resource on MMIO.
The following table is an example on some GPUs that require large MMIO space and the amount of MMIO space that each GPU requires.
| GPU | MMIO Space Required |
|---|---|
| NVIDIA A40 | 128 GB |
| NVIDIA RTX A5000 | 64 GB |
| NVIDIA RTX A5500 | 64 GB |
| NVIDIA RTX A6000 | 128 GB |
| Quadro RTX 6000 Passive | 64 GB |
| Quadro RTX 8000 Passive | 64 GB |
| Tesla V100 (all 16 GB variants) | 32 GB |
| Tesla V100 (all 32 GB variants) | 64 GB |
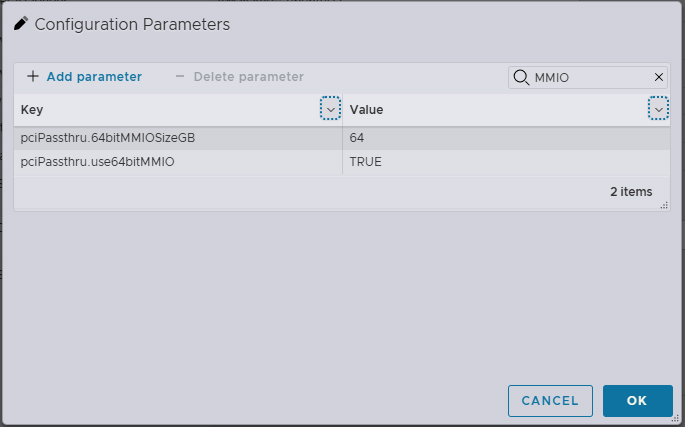
To enable 64-bit MMIO and large MMIO space. Under VM Options -> Advanced -> Edit Configuration
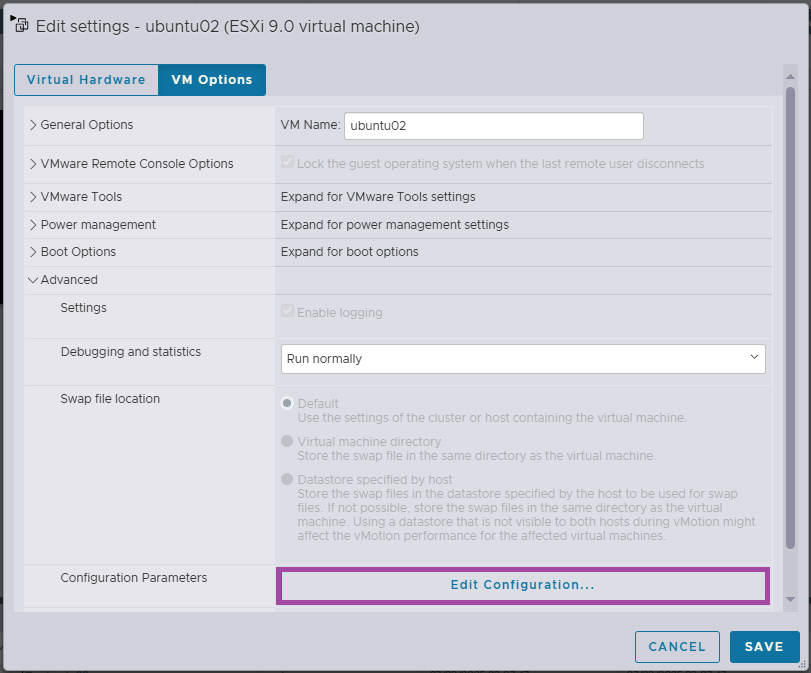
Add the following parameters:
pciPassthru.use64bitMMIO=”TRUE”
pciPassthru.64bitMMIOSizeGB=<n>
Replace <n> with the required MMIO size for your GPU.
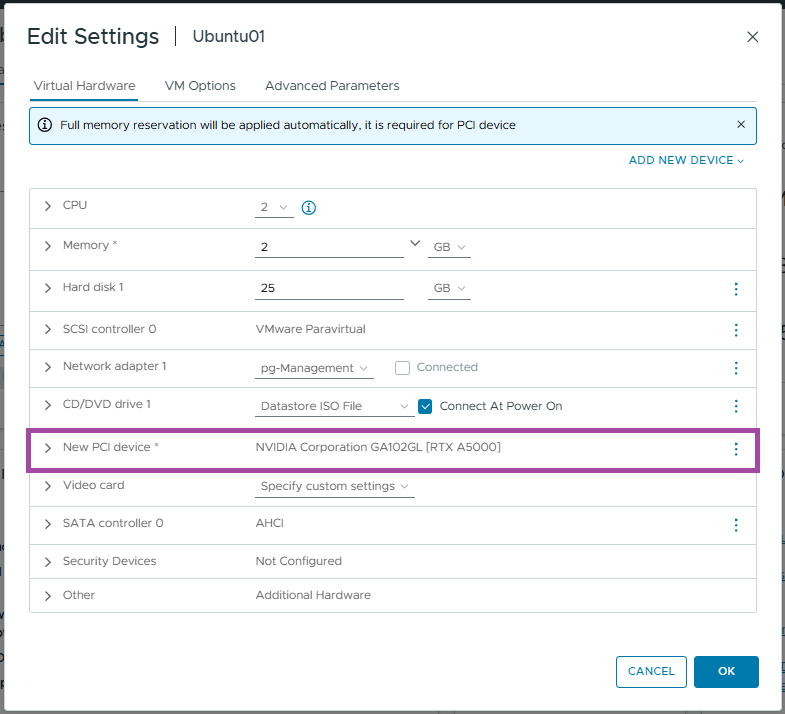
Step 3 – Attach the GPU to the VM
- Shut down the VM
- Edit the VM
- Under Add New Device, add a PCI Device

- Select the GPU (e.g. [RTX A5000])

After adding the GPU, note the memory reservation requirement noted at the top.
To use passthrough devices, the VM has to have a full memory reservation
You should see the GPU you selected listed under New PCI device and can click OK.
Disable the physical display ports
Now let’s use the Display Mode Selector Tool.
Step 1 – Download the Tool
Download the NVIDIA Display Mode Selector Tool from NVIDIA’s website. You’ll need to sign up for a free NVIDIA Developer Account to access the download and accept the warnings.
Copy the binary displaymodeselector to your VM. I used WinSCP to transfer it to my Ubuntu 24.04 VM.
Step 2 – Switch to Tool
sudo su -Step 3 – Grant Execute Permissions
chmod +x /home/vxworld/displaymodeselectorStep 4 – Query the GPU Mode
Using the command below, we can check the current display mode
/home/vxworld/displaymodeselector --listgpumodes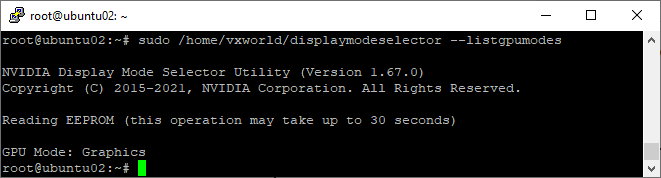
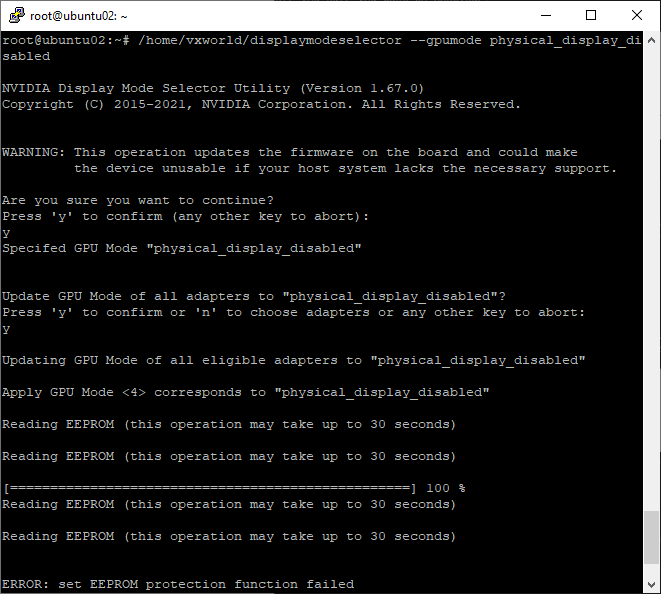
Step 5- Set the GPU Display mode to physical_display_disabled
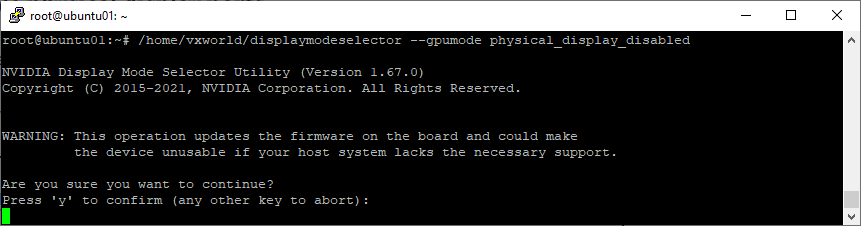
The commands below will set the display mode to disable for all GPUs passed to the VM. If you want to apply a change to a single GPU, read the documentation on the additional command line parameters.
WARNING
Changing the configuration of the physical display ports, such as enabling or
disabling them, should only be performed if a particular use case absolutely requires it since this alters its fundamental behaviour in the system. If modified incorrectly or used on an incompatible system, this can cause the GPU PCle board and system to be permanently unusable.
Proceed at your own risk. I accept no responsibility or liability for any damage caused.
If you are confident in what you are doing, enter the following command
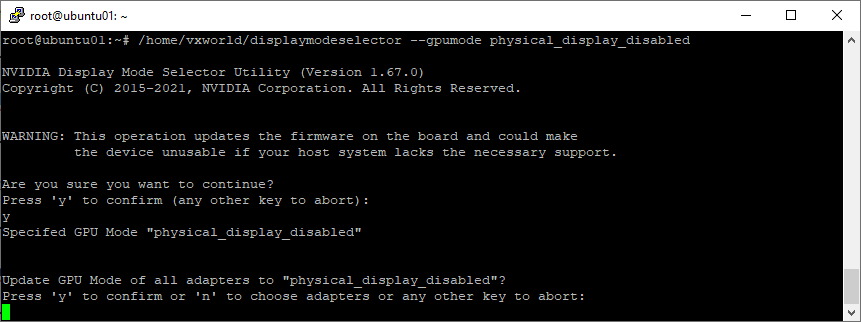
/home/vxworld/displaymodeselector --gpumode physical_display_disabled- Press y if you are sure you want to contine
- Press y if you want to update all GPUs
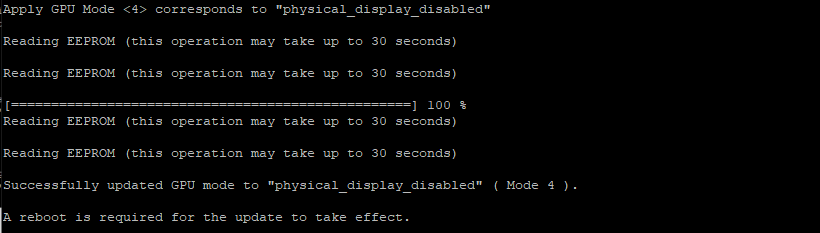
You should see, Successfully update GPU mode. If you get an error or after a reboot, you cannot access the GPU, check out the Troubleshooting Section below.
Step 6 – Query the GPU Mode
After rebooting, re-run the command:
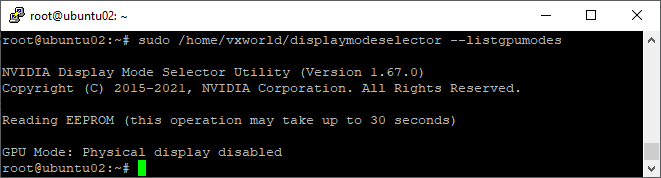
Ensure the mode is now physical_display_disabled.
Troubleshooting
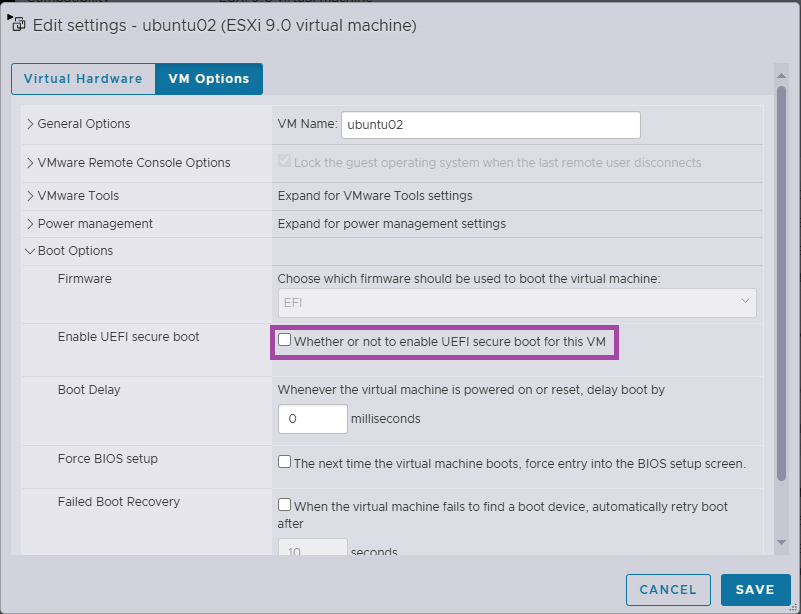
ERROR: access to physical memory denied
If you see the error ‘Operation not permitted’ – ‘ERROR: access to physical memory denied’

Make sure Secure Boot is disabled for the VM.
- Go to VM Options -> Boot Options
- Disable Enable UEFI secure boot
EEPROM protection function failed
If you get the error ‘ERROR: set EEPROM protection function failed’, It is likely large MMIO has not been set correctly.
Check that:
- The correct MMIO size is set in VM configuration
(Refer to the Create a VM section above) - 64-bit MMIO is enabled
Conclusion
Disabling the physical display ports on supported NVIDIA GPUs using the Display Mode Selector Tool is a critical step when preparing a GPU for use with NVIDIA vGPU software—particularly if the GPU defaults to display-enabled mode. While the process involves several prerequisite BIOS, VMware, and VM-level configurations, following each step carefully ensures compatibility and stability.
Keep in mind that this is a low-level change that can render your GPU or host system unusable if applied incorrectly. Always refer to NVIDIA’s official documentation and test changes in a controlled environment before deploying them in production.
By completing this process, your system should now be correctly configured to support vGPU workloads, unlocking powerful virtualised GPU capabilities for your virtual machines.
If you run into any issues or have questions, feel free to share your experience in the comments below.


Leave a comment