VMware Cloud Foundation (VCF) 9 is the first major release since Broadcom’s acquisition of VMware, and it represents a significant leap forward. Designed to bring public cloud-like capabilities to the on-premises private cloud, VCF 9 promises a more integrated and automated experience than ever before.
This post kicks off a new series where I get hands-on with VCF 9 — starting with a deep dive into the brand-new VCF Installer, the successor to Cloud Builder (used in VCF 5.2 and earlier).
If you’re looking for a high-level overview of VCF 9 features, check out my post: A First Look at VMware Cloud Foundation 9.
- What’s New: A Better Installer Experience
- High-Level Logical Components
- Before We Begin: Lessons from the Lab
- DNS Requirements
- ESX 9 VM configuration
- vSAN VIB – Enabling vSAN ESA Compatibility in a Nested Lab
- VCF Installer Deployment
- VCF Installer: Binary Management
- VCF Installer: Deployment Wizard
- JSON Format
- Troubleshooting
- Credits
What’s New: A Better Installer Experience
The VCF 9 Installer is a massive improvement over its predecessor. Compared to the old Excel-based Cloud Builder method, the new approach is more robust, polished, and streamlined. It comes with:
- A modernized wizard-based UI
- Significantly improved built-in validation
- Support for JSON-based configuration files
- Broader scope of deployment, reducing post-bring-up tasks
You can now choose between using the interactive UI wizard or simply uploading a JSON file for automation.
High-Level Logical Components
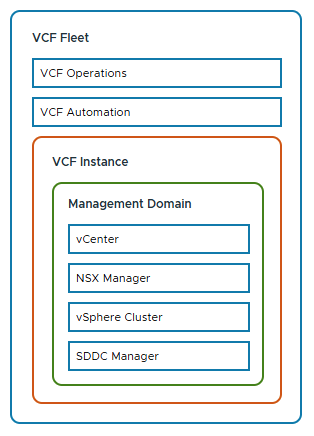
The diagram below shows the components of a VCF 9 deployment. It introduces the VCF Fleet, with Operations and Automation sitting above the VCF Instance. These fleet-level services provide centralised management across multiple instances, while each instance includes its own vCenter, NSX Manager, vSphere Cluster, and SDDC Manager.
Before We Begin: Lessons from the Lab
Before diving into the walkthrough, I want to share a few hard-earned lessons from building this nested ESX 9 lab environment. These issues stemmed from running a nested lab setup and may save you hours of troubleshooting:
💥 Don’t Clone ESXi VMs
Cloning ESXi VMs is tempting when setting up a lab quickly, but it causes subtle and painful issues. As of 2021, William Lam has updated his guidance to recommend not cloning ESXi hosts — and I fully agree after losing hours to it.
✅ Use the vSAN ESA Mock VIB, Not JSON
If you’re using vSAN ESA for your management domain. Don’t use the create_custom_vsan_esa_hcl_json.ps1 script. While it helps pass validation, for me, it lead to failures during vCenter deployment:
Error: No storage pool eligible disks found on ESXi Host xyxyxyxy
Remediation: Provide ESXi Host with vSAN ESA eligible disks
Reference Token: GU0SAE
Instead, use the vSAN ESA HCL mock VIB method.
✅ Enable Promiscuous Mode and Forged Transmit
While MAC Learning + Forged Transmit is better for performance, the deployment failed at:
“Migrate ESXi Host Management vmknic(s) to vSphere Distributed Switch”
For installation, enable Promiscuous Mode and Forged Transmit. You can revert to your preferred settings post-deployment.
DNS Requirements
As with previous VCF versions, DNS pre-configuration is critical. Missing or incorrect DNS entries will cause deployment validation to fail. The table below lists the required entries for my setup:
| Name | IP Address | Purpose |
|---|---|---|
| vcf-ins-01 | 10.50.10.1 | VCF 9 Installer |
| vcf-m1-esx01 | 10.50.10.11 | Mgmt. Domain ESX host |
| vcf-m1-esx02 | 10.50.10.12 | Mgmt. Domain ESX host |
| vcf-m1-esx03 | 10.50.10.13 | Mgmt. Domain ESX host |
| vcf-m1-esx04 | 10.50.10.14 | Mgmt. Domain ESX host |
| vcf-m1-vc01 | 10.50.10.21 | Mgmt. Domain vCenter |
| vcf-sddc | 10.50.10.20 | SDDC Manager |
| vcf-portal | 10.50.10.109 | VCF Automation |
| vcf-m1-nsx | 10.50.10.30 | Mgmt. Domain NSX Virtual IP |
| vcf-m1-nsx01 | 10.50.10.31 | Mgmt. Domain NSX Node |
| vcf-m1-nsx02 | 10.50.10.32 | Mgmt. Domain NSX Node |
| vcf-m1-nsx03 | 10.50.10.33 | Mgmt. Domain NSX Node |
| vcf-ops-pri | 10.50.10.101 | VCF Operations Primary |
| vcf-ops-rep | 10.50.10.102 | VCF Operations Replica |
| vcf-ops-data | 10.50.10.103 | VCF Operations Data |
| vcf-ops-col | 10.50.10.104 | VCF Operations Collector |
| vcf-fleet | 10.50.10.110 | VCF Operations fleet management appliance |
ESX 9 VM configuration
Let’s start with building the nested ESX 9 environment. (Yes — it’s back to being called ESX, not ESXi!)
VM Build
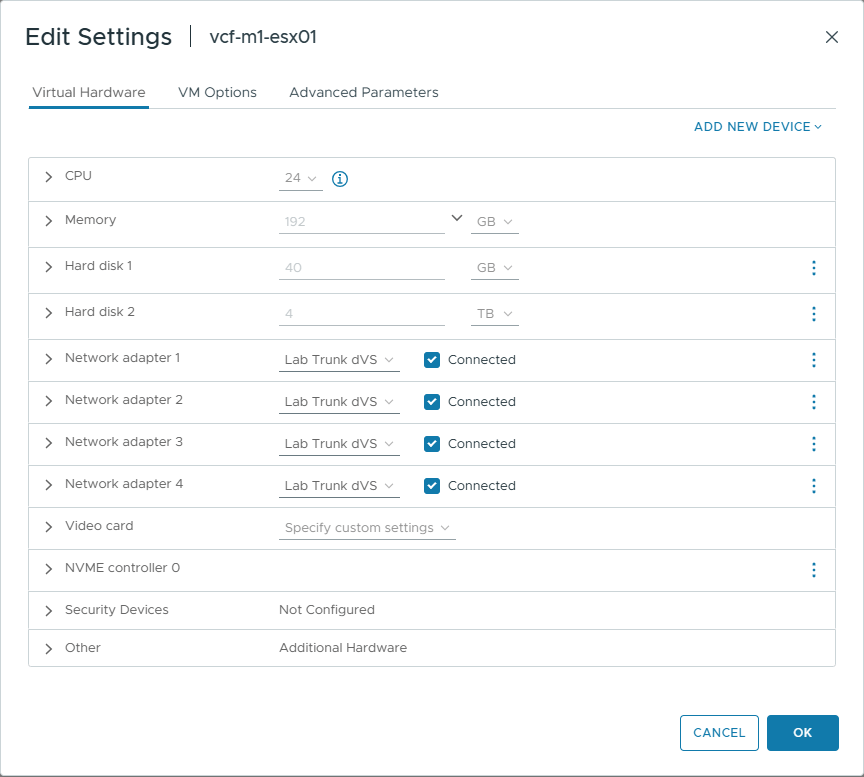
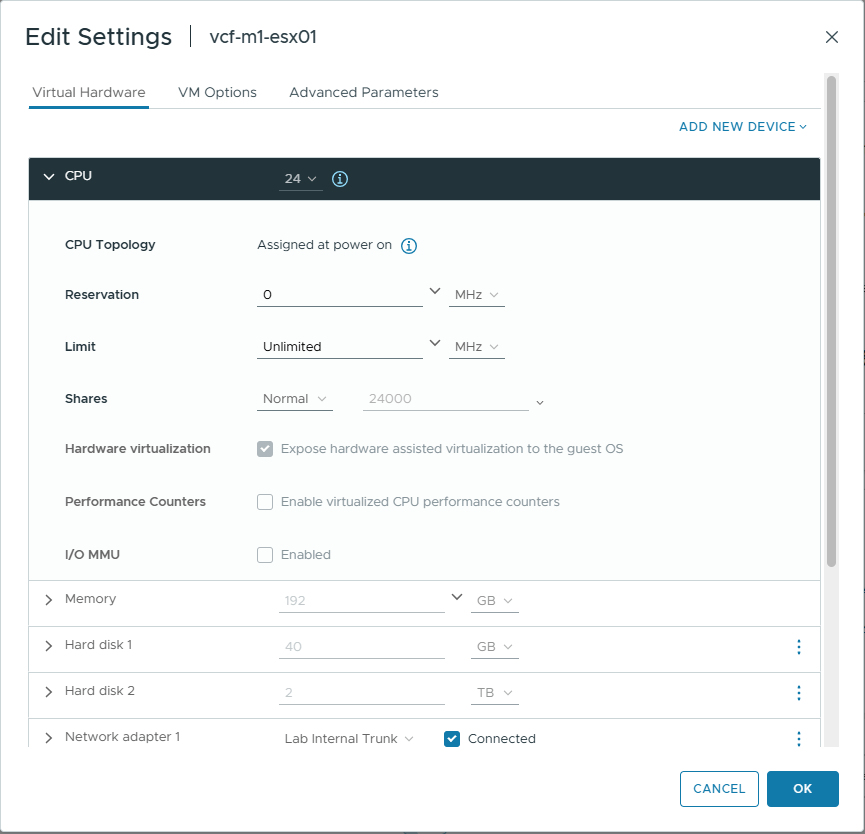
I’m deploying the management domain as a vSAN ESA cluster. The nested VM configuration is based on the following key settings:
- 24 vCPUs
The VCF Automation VM requires 24 vCPUs to boot successfully for a single-node installation. Thanks to Erik for highlighting this requirement in his excellent post on VCF Automation vCPU requirements. - Four Network Adapters
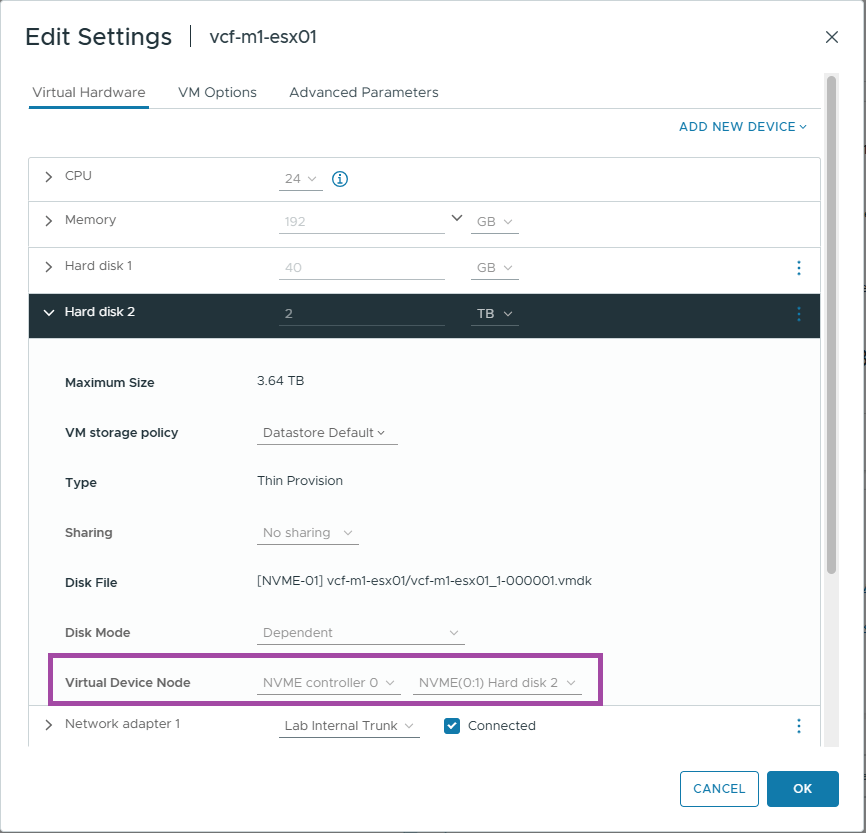
Add four NICs to each ESX VM. This enables flexibility in network topology and supports various deployment scenarios. - NVMe Controller
Use an NVMe controller for all hard disks. This is critical for vSAN ESA compatibility. - CPU Virtualization Settings
In the VM options, expose hardware-assisted virtualization to the guest OS. Without this setting, nested ESX VMs will be unable to power on child VMs. - Post-Install Cleanup
After installing ESX 9, remove the CD-ROM drive and SCSI controller. These are no longer needed and can cause the installer to fail.
Expose hardware assisted virtualisation to the guest OS
Ensure the hard drives are using the NVME controller.
Now that the nested VMs are configured, you’re ready to install ESX 9 on each of them.
ESX 9 Configuration
After installing ESX 9 on your nested hosts, a few critical configuration steps are required to ensure compatibility with the VCF 9 Installer. These steps help pass pre-checks and avoid common pitfalls during deployment.
Step 1 – Set a Compliant Root Password.
The VCF Installer enforces strict password requirements. Ensure the root password on each ESX 9 host meets the following criteria:
Password must contain at least 1 special character. Special characters [@!#$%?^]. Password must contain only letters, numbers and the following special characters: [@!#$%?^]
Step 2 – Configure NTP.
Time synchronization is critical for VCF deployments. You can configure NTP using either the command line or the vSphere web interface.
Tip
Ensure all hosts use the same NTP server and confirm the clocks are synchronised before starting VCF installation. Use date on each host to verify time alignment.
Option 1: Using esxcli (CLI Method)
# Specify the NTP servers by IP address
esxcli system ntp set -s=192.168.1.2

# Start the ntpd service
esxcli system ntp set -e=yes

# Check the status
esxcli system ntp get
Option 2: Using the vSphere UI
If you prefer a graphical interface, you can configure NTP settings via the ESX host UI. Follow the same steps used in ESXi 8 NTP Configuration — they apply to ESX 9 as well.
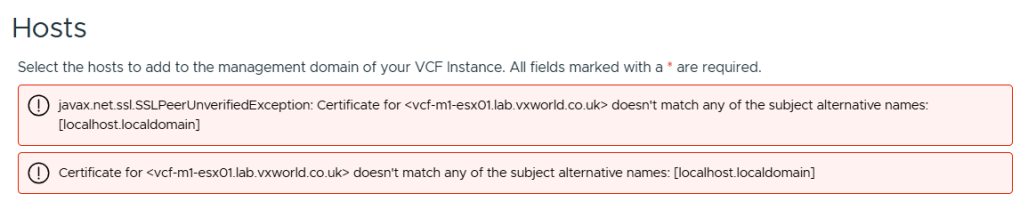
Step 3 – Generate SSL Certificates with the correct CN.
/sbin/generate-certificates
/etc/init.d/hostd restart && /etc/init.d/vpxa restart
If you do not do this, you will likely get the error
jjavax.net.ssl.SSLPeerUnverifiedException: Certificate for FQDN doesn’t match any of the subject alternative names: [localhost.localdomain]
As we are deployed a nested lab, I need to emulate compatible host hardware to get it to build a vSAN ESA node.
vSAN VIB – Enabling vSAN ESA Compatibility in a Nested Lab
As mentioned earlier, I needed to use the vSAN ESA HCL hardware mock VIB to deploy VCF 9 successfully in a nested lab environment. The JSON override method passed validation but failed during deployment — specifically when VCF attempted to create the vSAN storage pool.
Deployment Error Encountered
No storage pool eligible disks found on ESXi Host xyxyxyxy Remediation: No storage pool eligible disks found on ESXi Host. Provide ESXi Host with vSAN ESA eligible disks Reference Token: GU0SAE
To avoid this, I followed William Lam’s workaround documented in his post: vSAN ESA Disk & HCL Workaround for VCF 9.0
Below is a step-by-step guide to installing the mock VIB required to emulate ESA-compatible hardware.
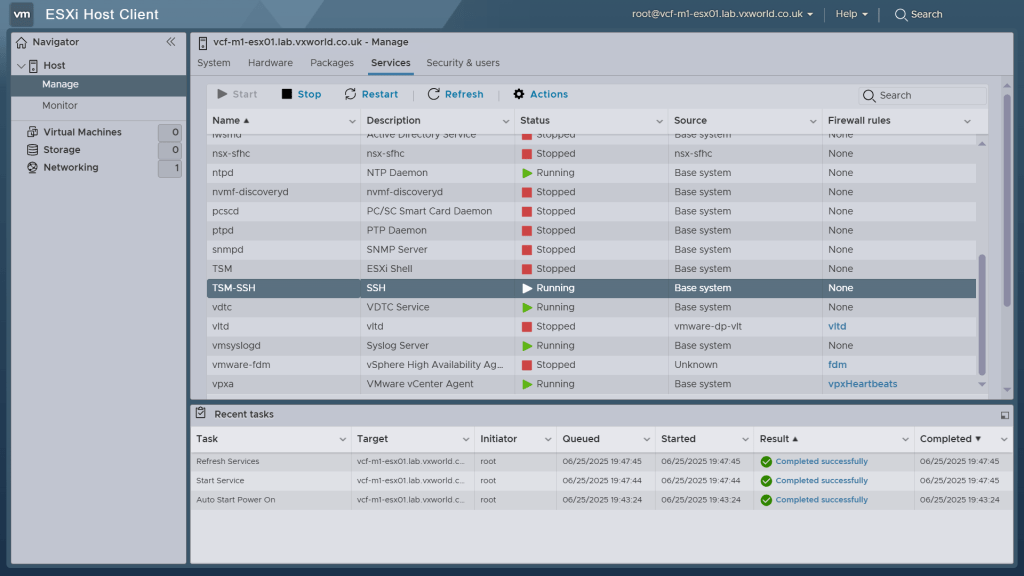
Step 1 – Enable SSH on the ESX Host
You’ll need SSH access to copy the file and run commands.
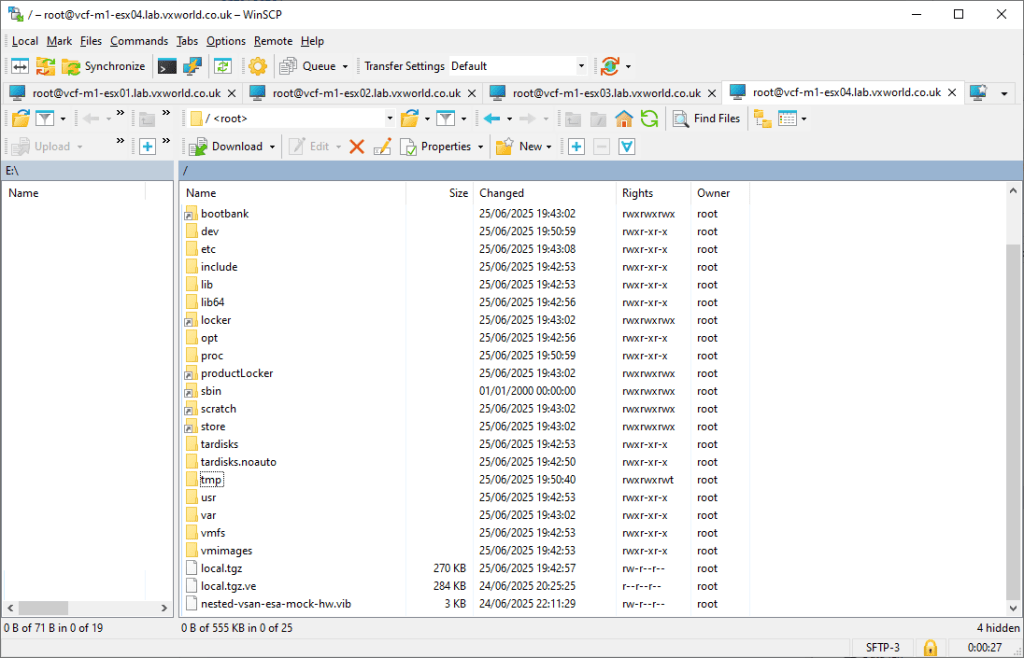
Step 2 – Copy the VIB to the Host
Download the mock VIB from William Lam’s GitHub repository and use WinSCP (or your preferred SCP tool) to transfer it to the root (/) directory of the ESX host.
⚠️ Tip: Do not copy the VIB to /tmp. While the install may appear to succeed, VCF bring-up might fail unless the file is placed in /
Step 3 – Install the VIB
SSH into the host and run the following commands:
# Set acceptance level to CommunitySupported

[root@esxi:~] esxcli software acceptance set --level CommunitySupported

# Install the VIB

[root@esxi:~] esxcli software vib install -v /nested-vsan-esa-mock-hw.vib --no-sig-check
You should see an output like this:
Installation Result
   Message: Operation finished successfully.
   VIBs Installed: williamlam.com_bootbank_nested-vsan-esa-mock-hw_1.0.0-1.0
   VIBs Removed:
   VIBs Skipped:
   Reboot Required: false
Step 4 – Restart the vSAN Management Service
[root@esxi:~] /etc/init.d/vsanmgmtd restart
With the hosts fully prepared — including vSAN support, NTP, DNS, and certificates — we’re ready to deploy the VCF 9 Installer appliance.
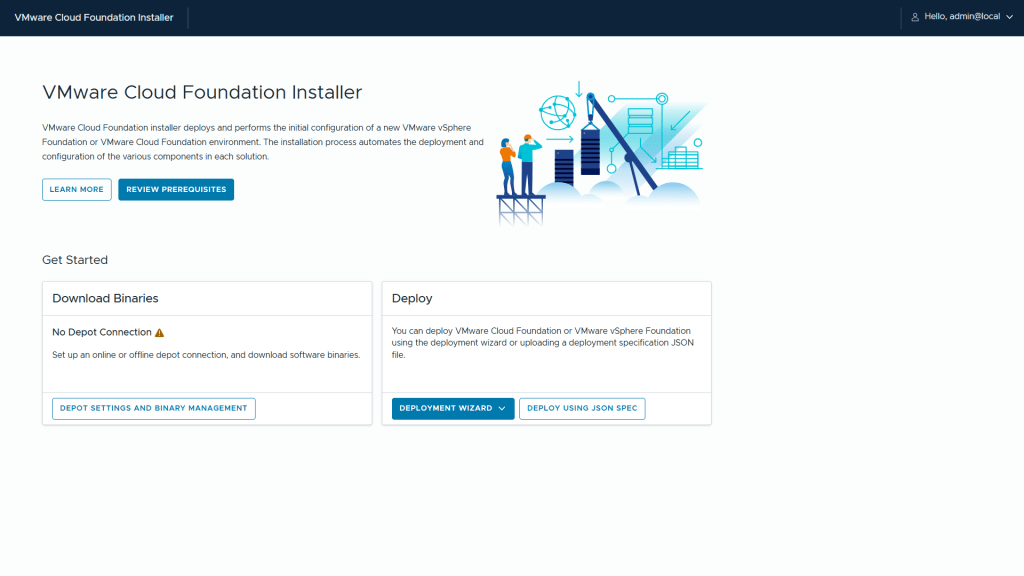
VCF Installer Deployment
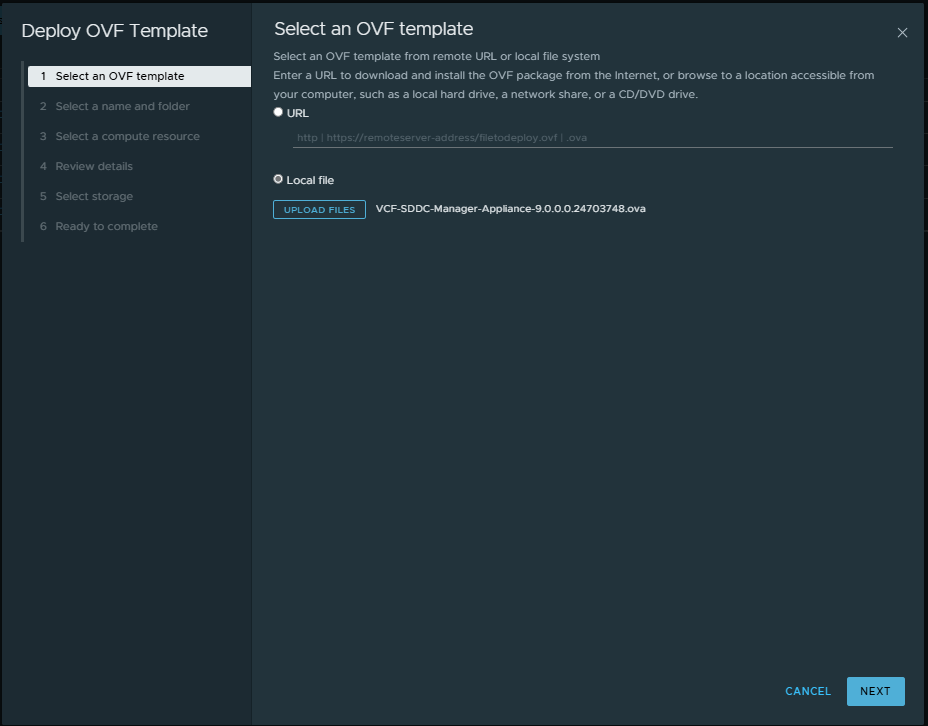
The VCF 9 Installer is delivered as an OVA and can be deployed on a standalone ESXi host or even VMware Workstation.
Below is a step-by-step guide to deploying the appliance:
Step 1 – Select the VCF Installer OVA
Begin by choosing the VCF Installer OVA file from your local machine or datastore.
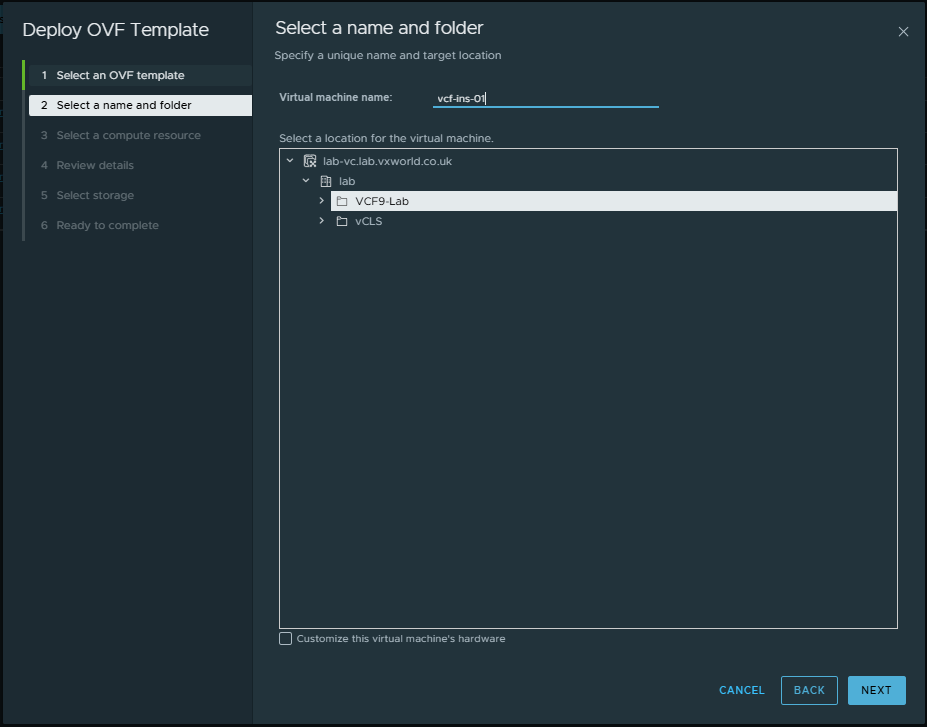
Step 2 – Name the VM and Choose Its Location
Give your VCF Installer VM a name, and select the folder or location in your inventory where it should reside.
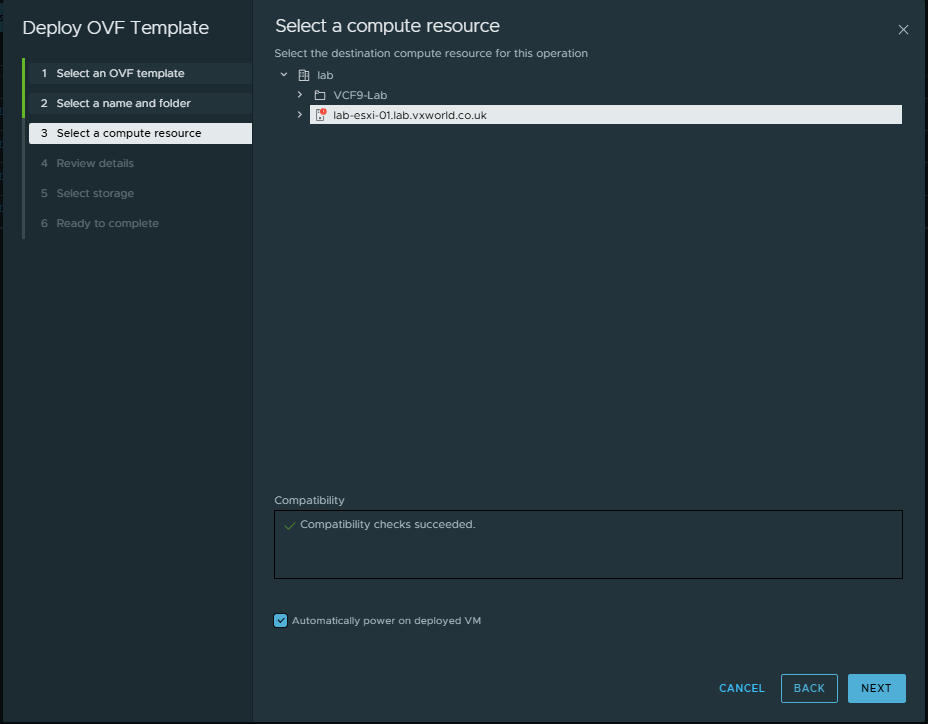
Step 3 – Select a Host or Cluster
Choose the ESXi host or Cluster on which the appliance will run.
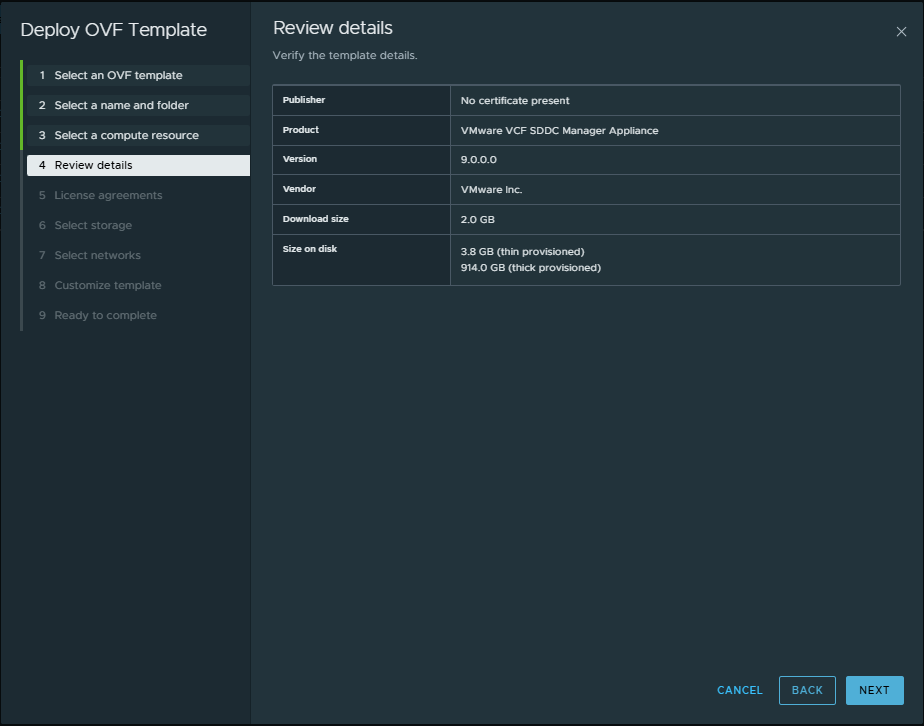
Step 4 – Review the Deployment Details
Review the appliance configuration details to confirm everything looks correct.
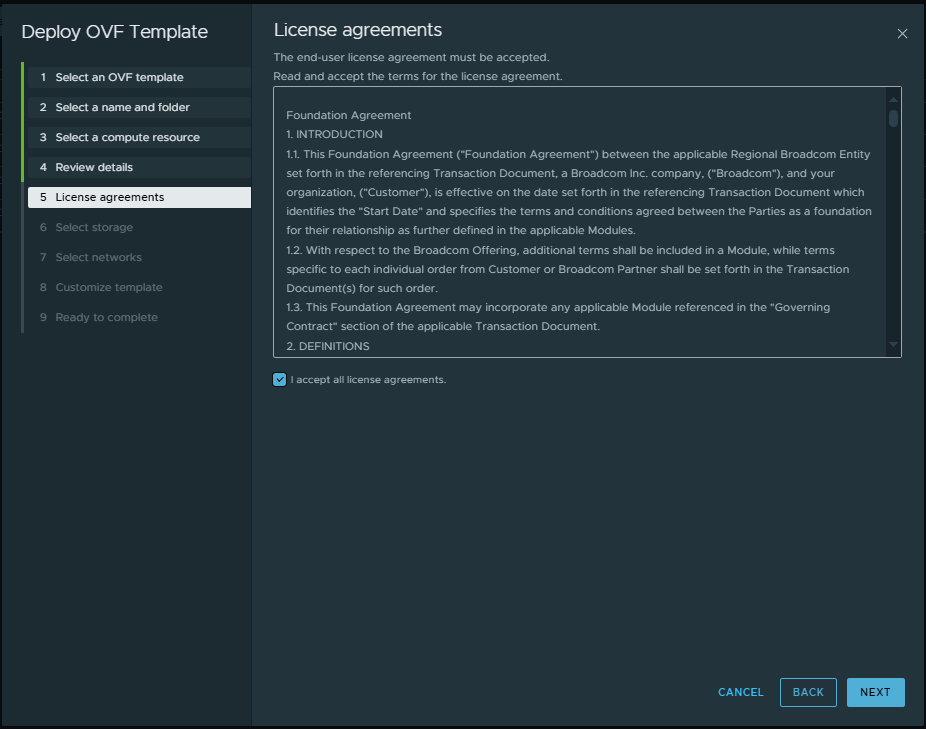
Step 5 – Accept the License Agreement
You must check the box to accept the VMware license agreement in order to continue.
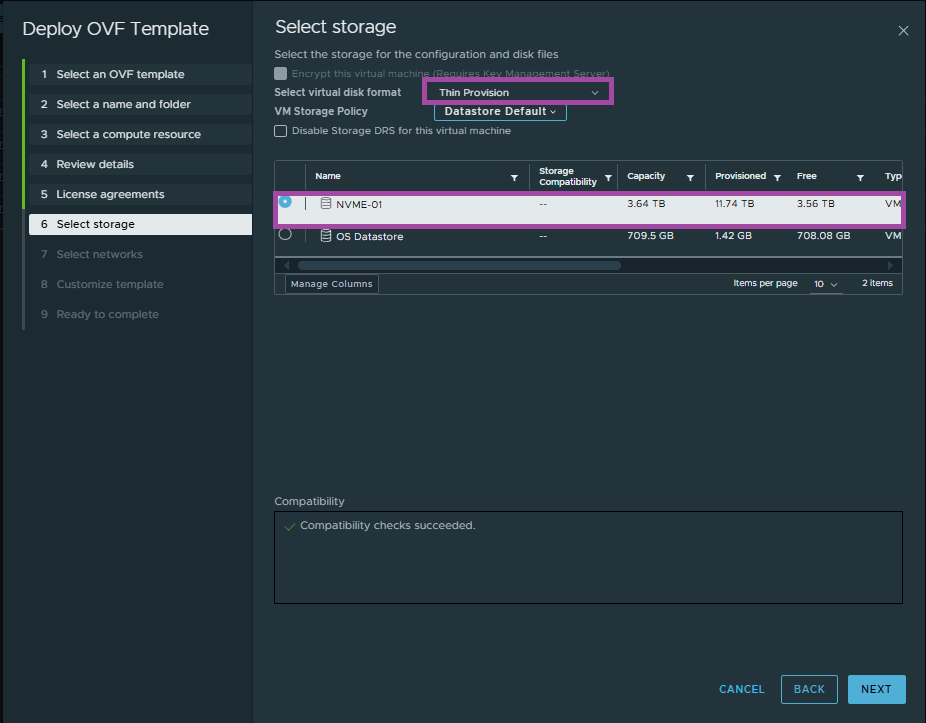
Step 6 – Select Storage Options
Choose the appropriate datastore and select Thin Provisioning if you’re limited on space (which is common in lab environments).
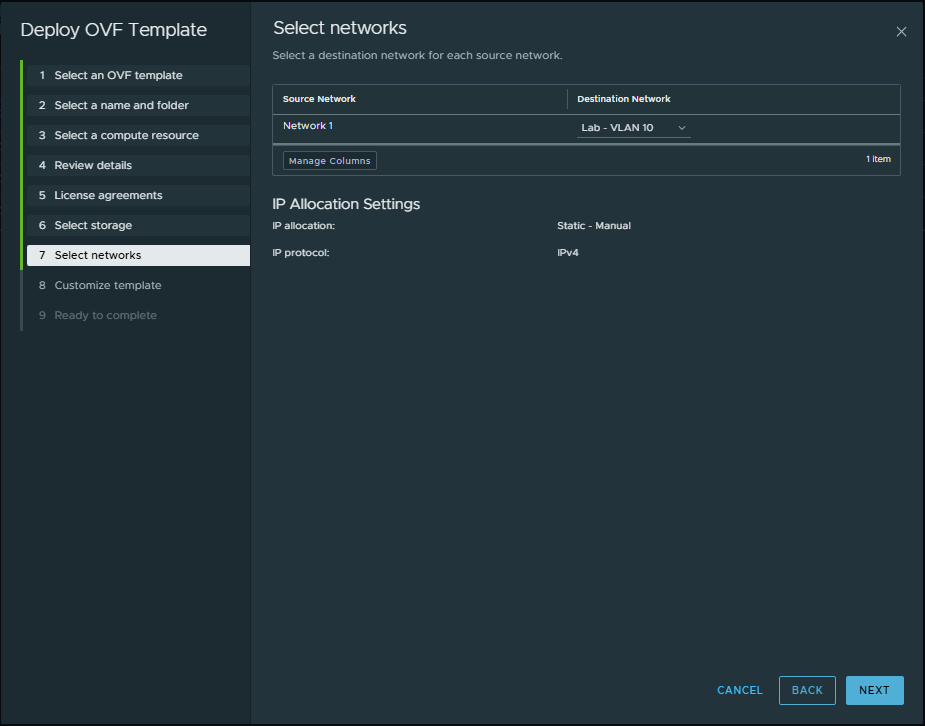
Step 7 – Select a Network
Pick the network you want the VCF Installer to connect to. Ensure the selected network has proper DNS, NTP, and gateway connectivity.
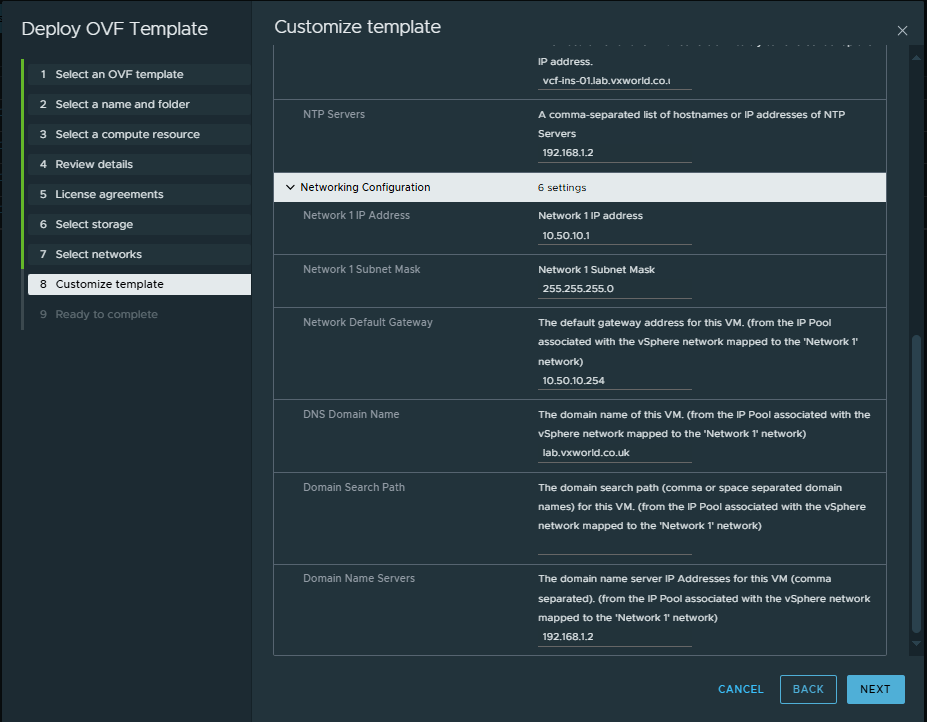
Step 8 – Customise the Template
This step configures all essential OVA parameters:
- DNS server(s)
- Root password
- Local user account
- FQDN (hostname)
- NTP servers
- IP address
- Subnet mask
- Gateway
- DNS domain name
- Search domain

Step 9 – Deployment Complete.
After customizing the OVA and clicking Finish, the VCF 9 Installer appliance will deploy. Once powered on, it will auto-configure based on the input parameters and should be ready after a few minutes.
At this point, the VCF 9 Installer UI should be accessible at: https://<installer-fqdn>
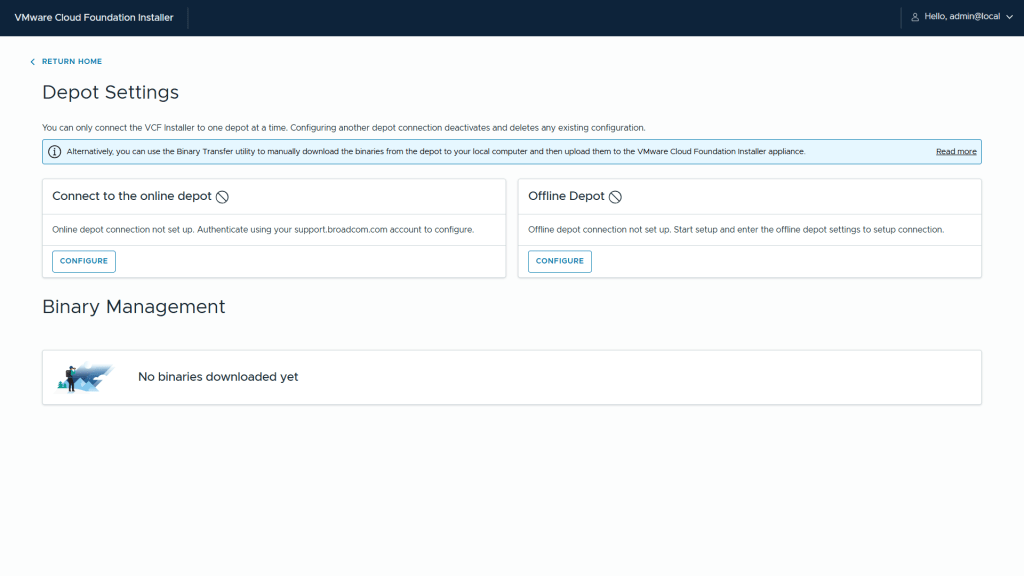
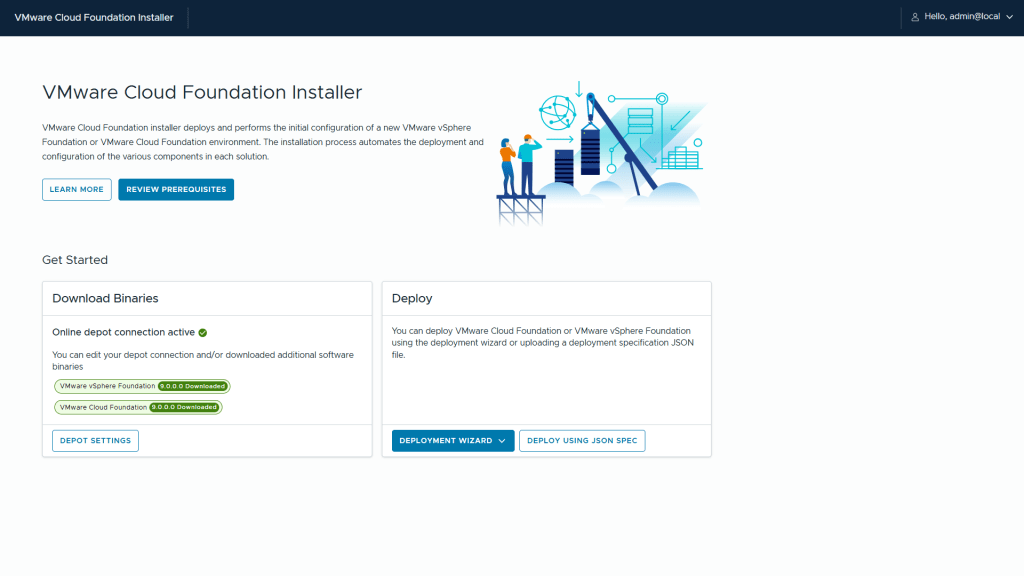
VCF Installer: Binary Management
With the VCF 9 Installer appliance successfully deployed and powered on, the first step in preparing for deployment is to download and manage the required binaries.
These binaries include all necessary components for the initial deployment — such as vCenter, ESX, NSX, SDDC Manager, and other infrastructure services.
Step 1 – click Deport Settings and Binary Management
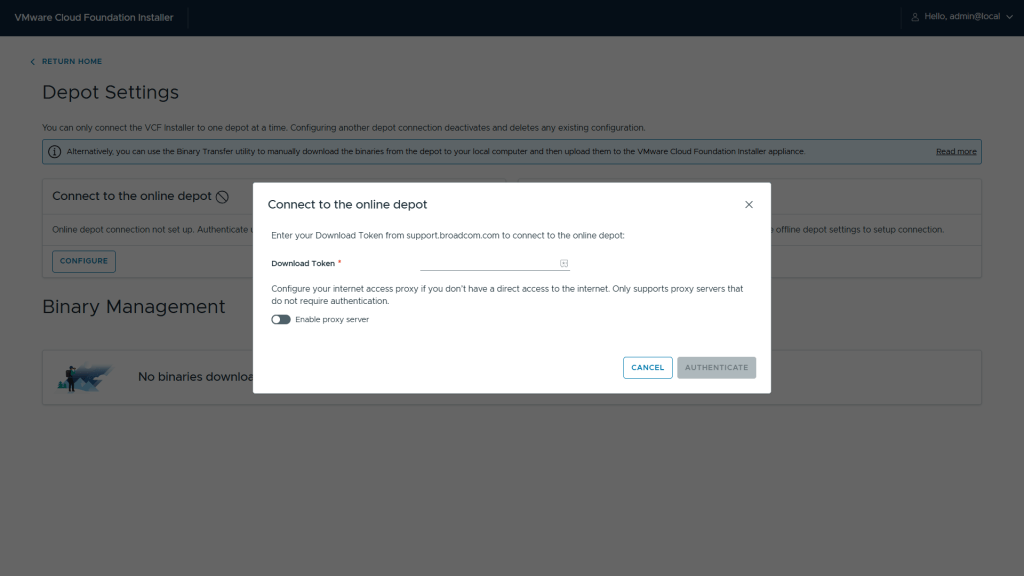
Step 2– Next we can select if we want to connect to the online depot or an offline depot. I will be connecting to the online depot – click Configure under online depot
Tip
If you need to setup an offline depot, check out Download Install Binaries to an Offline Depot
Alternatively you can use the Binary Transfer utility to transfer the files directly to the VCF Installer appliance – check out Use the VMware Cloud Foundation Download Tool to Download Install Binaries
Note: you still need a download token for either of these options
Step 3 – Enter your Download Token and click Authenticate
Step 4 – You should now see the versions available (9.0.0.0)
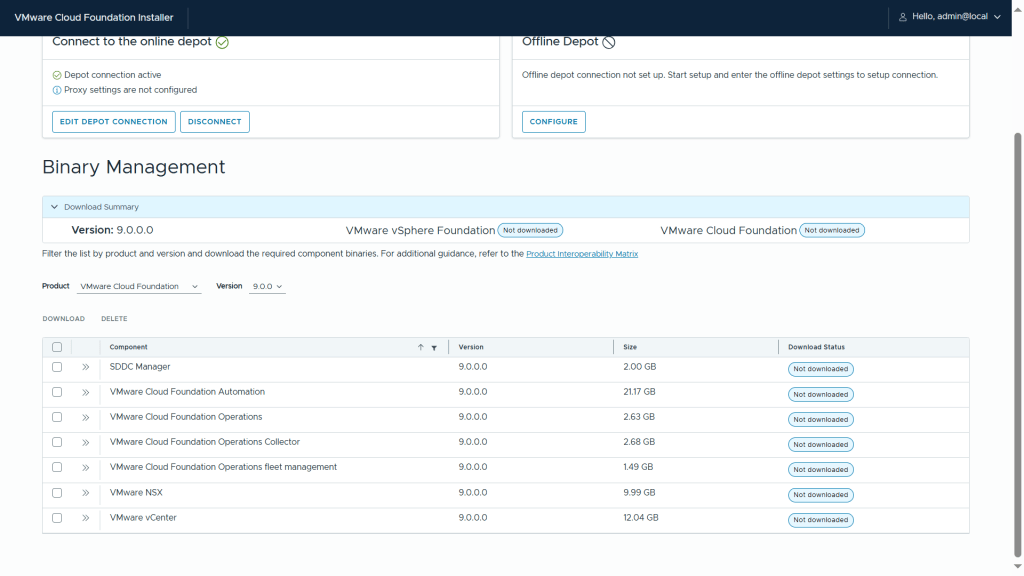
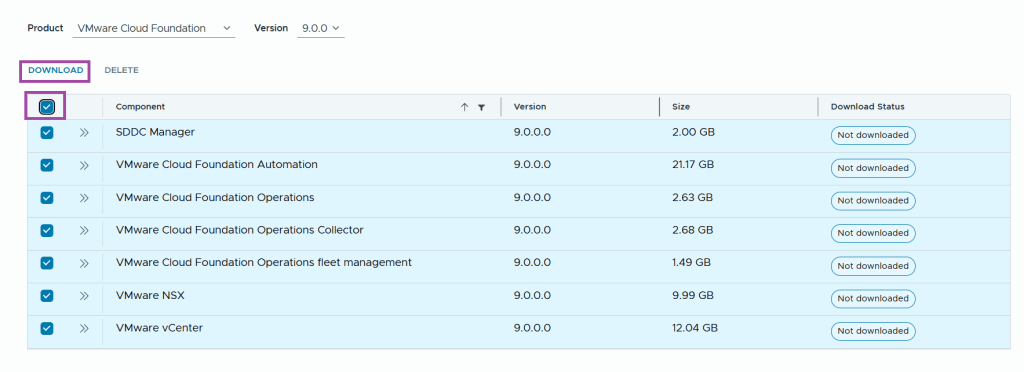
Step 5 – Check the components and click Download
Step 6 – Make a cup of coffee and wait for the downloads to complete a validate
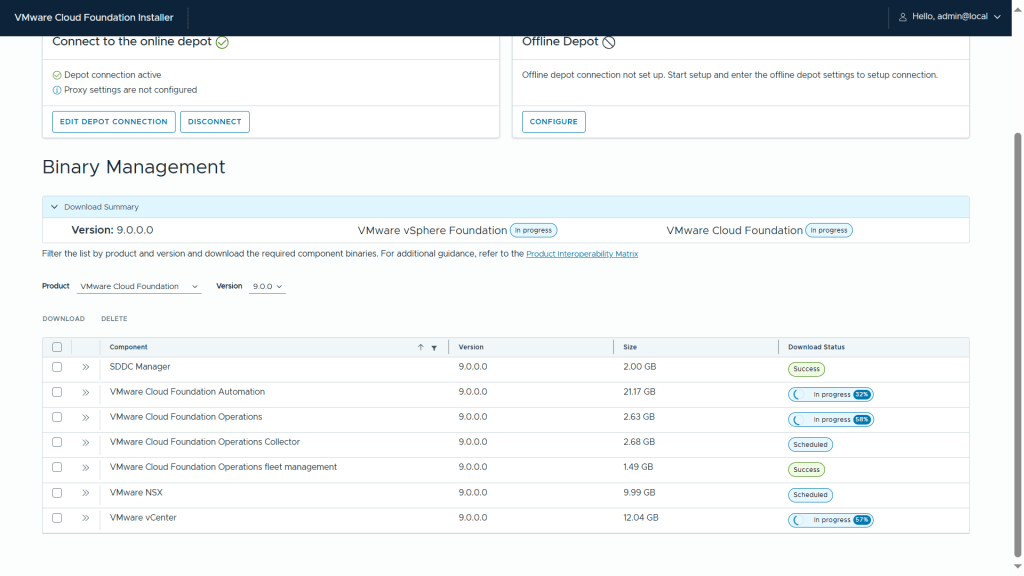
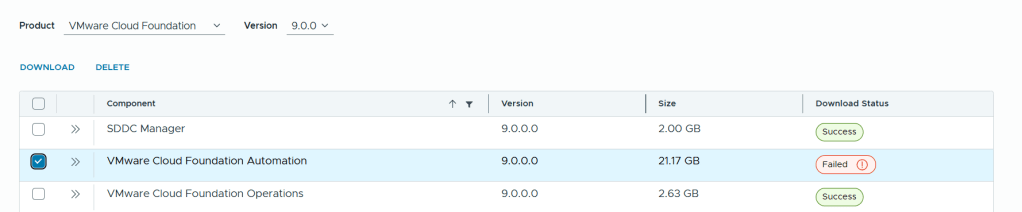
Note: I experienced a failure with the download of one of the components – VMware Cloud Foundation Automation. I selected it and clicked download – it succeeded on the second attempt.
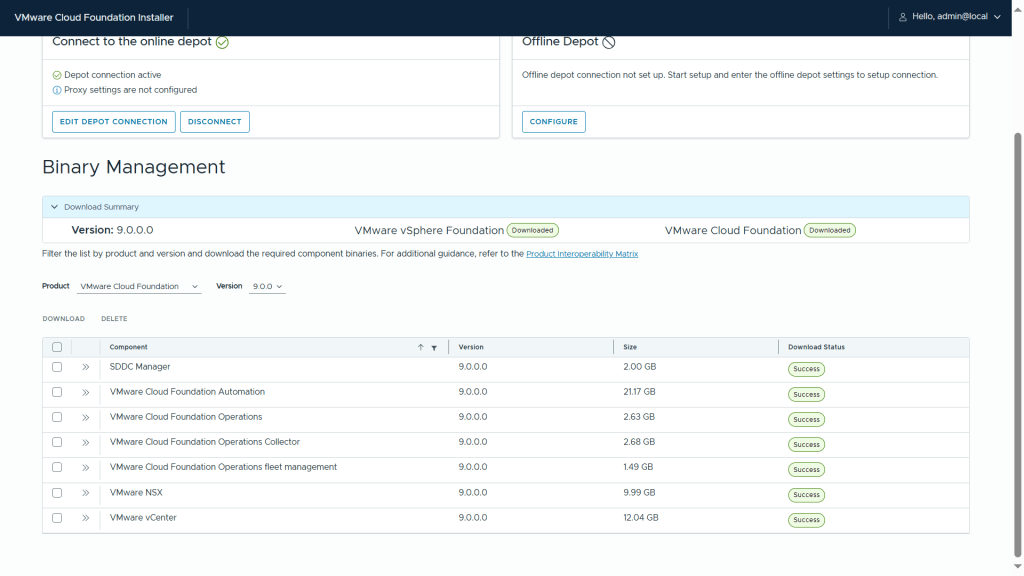
Step 7 – Once all the binaries have been downloaded, you should see the download status as Success
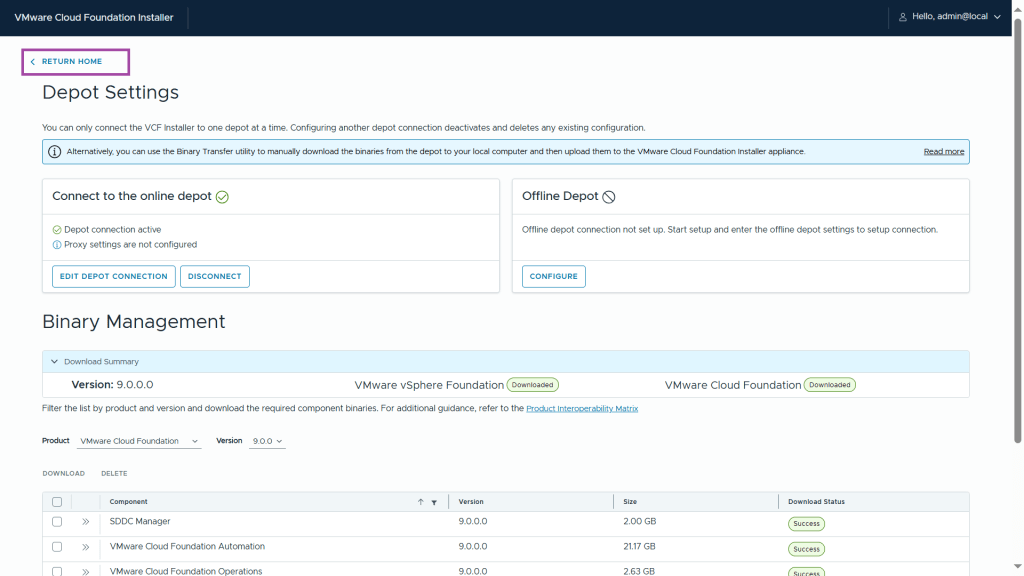
Step 8 – Next we click Return Home
VCF Installer: Deployment Wizard
With all required VCF 9 binaries downloaded and validated, we’re now ready to launch the Deployment Wizard. This is where the actual deployment process begins — configuring your management domain, validating infrastructure, and deploying the core components of your private cloud.
Step 1 – Click Deployment Wizard and VMware Cloud Foundation
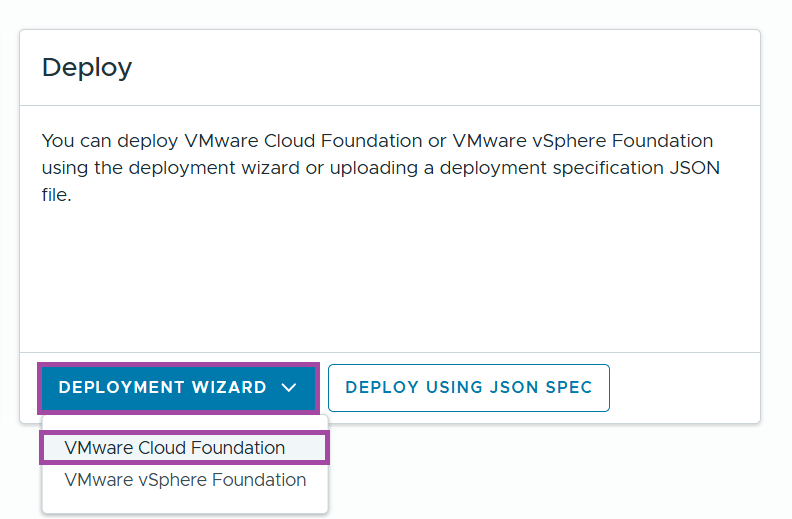
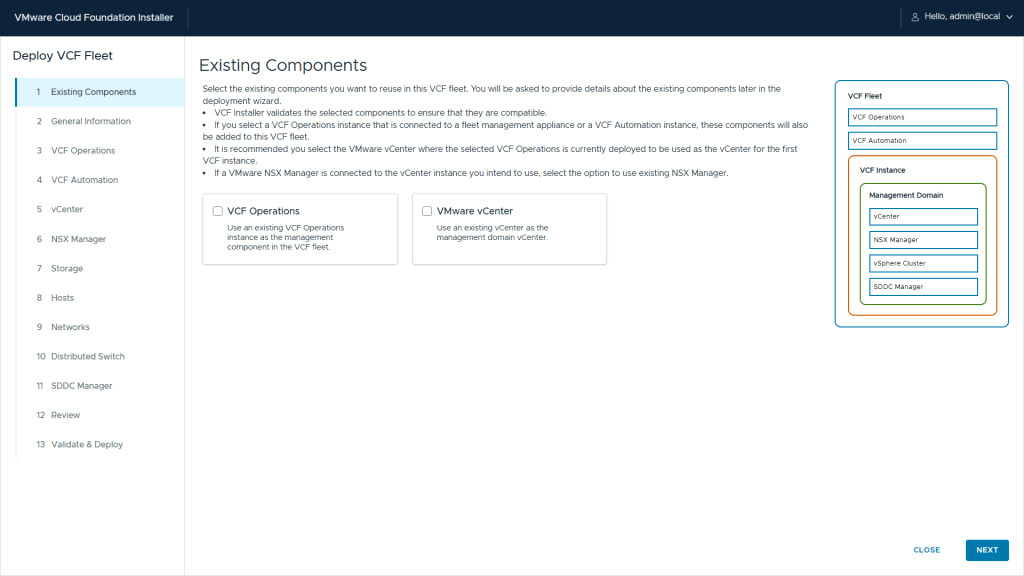
Step 2 – If you have a brownfield site and need to import VCF Operation or VMware vCenter, you can check the boxes, in my case, it is greenfield so I will progress to the next screen.
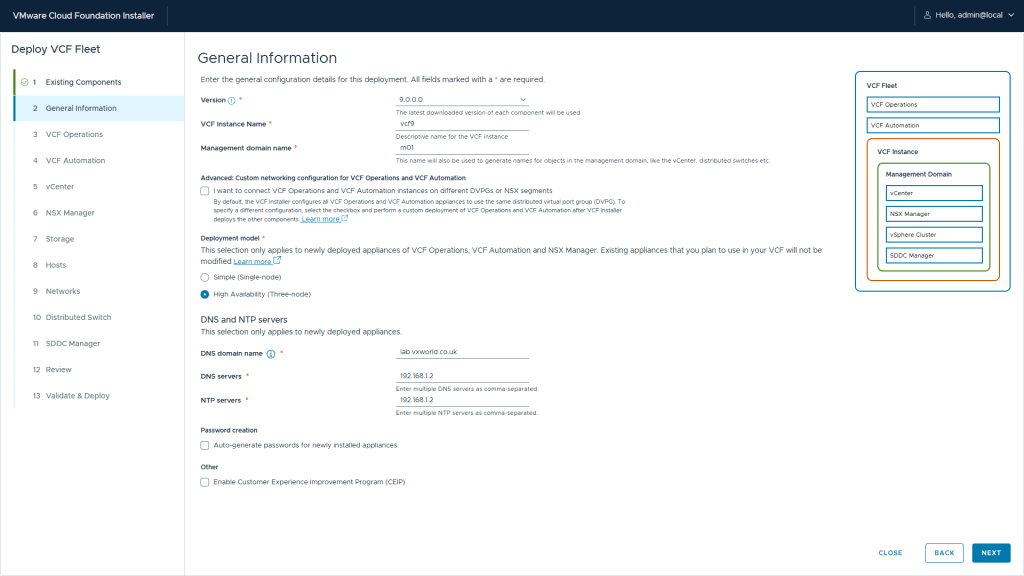
Step 3 – Enter the general information:
- VCF Version
- VCF Instance Name
- Management domain name
- Deployment model – Single or High Availability
- DNS domain name
- DNS servers
- NTP servers
Tip
You can get the installer to auto generate the component passwords, it will display the passwords it sets at the end of the deployment
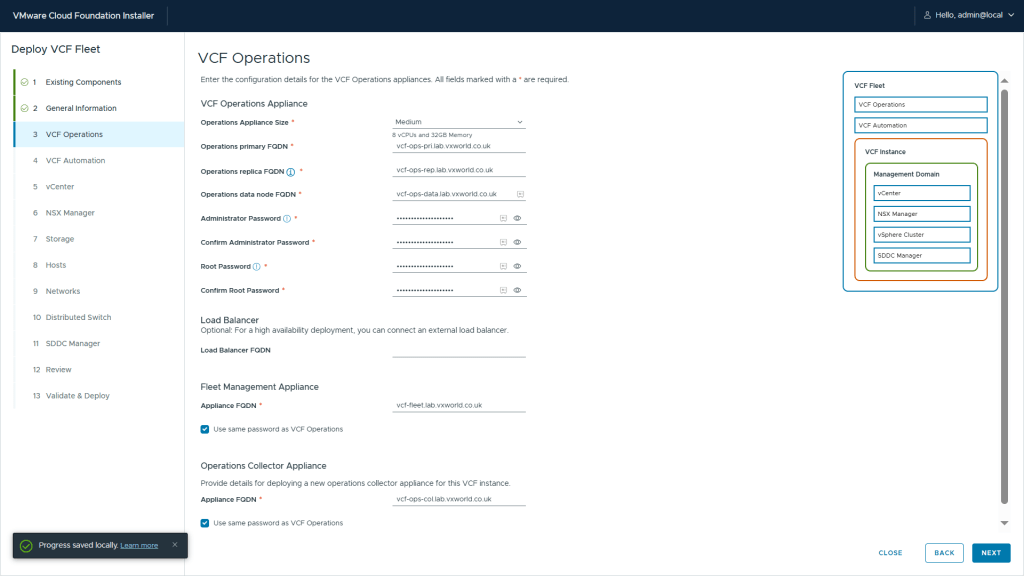
Step 3 – Enter the VCF Operations configuration values:
- Operations Appliance Size
- Operations primary FQDN
- Operations replica FQDN
- Operations data node FQDN
- Administrator Password
- Root Password
- Load Balancer FQDN (optional)
- Fleet Management Appliance FQDN
- Operations Collector Appliance FQDN
Tip
Your DNS entries need to exist before you can click next. Check out the list of DNS entries at the start of this post.
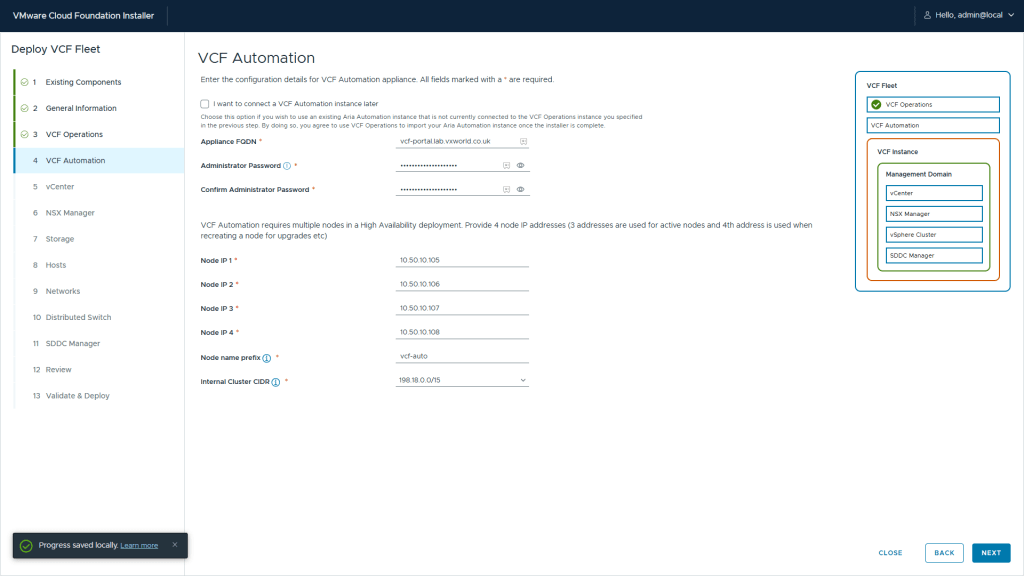
Step 4 – Enter the VCF Automation configuration values:
- VCF Automation Appliance FQDN
- Administrator Password
- Node IP 1
- Node IP 2
- Node IP 3
- Node IP 4
- Node name prefix
- Internal Cluster CIDR
Step 4 – Enter the vCenter configuration values:
- Appliance FQDN
- Appliance Size
- Appliance Storage Size
- Datacenter Name
- Cluster Name
- SSO Domain Name
- Administrator Password
- Root Password

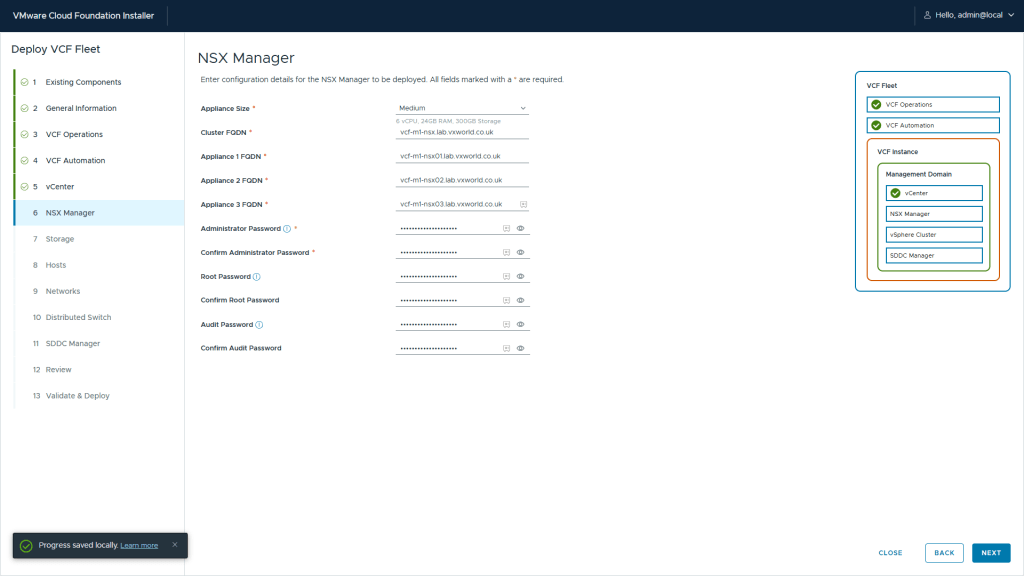
Step 5 – Enter the NSX Manager configuration values:
- Appliance Size
- Cluster FQDN
- Appliance 1 FQDN
- Appliance 2 FQDN
- Appliance 3 FQDN
- Administrator Password
- Root Password
- Audit Password
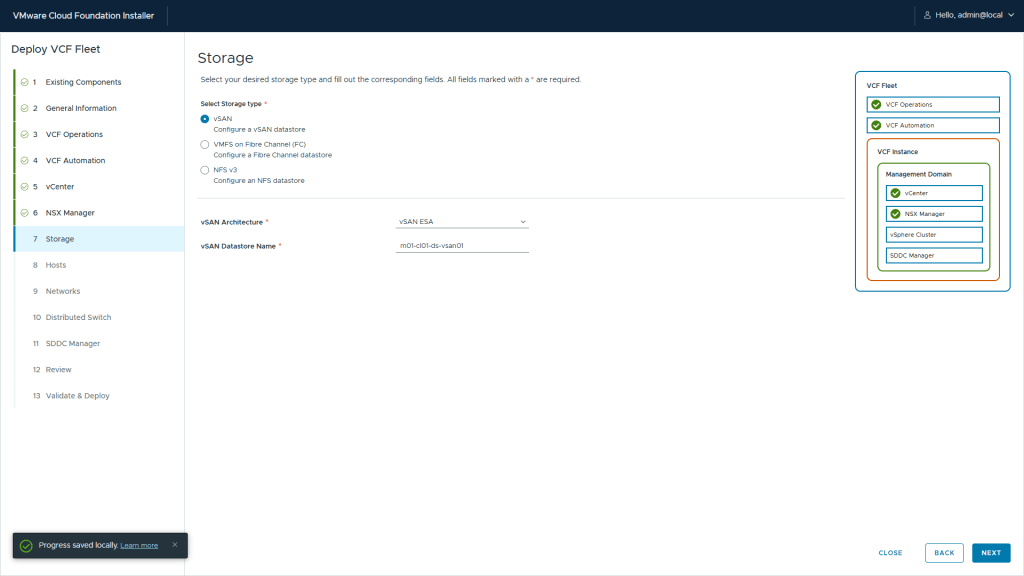
Step 6 – Enter the Storage configuration values:
- Select Storage type: vSAN, VMFS on Fibre Channel or NFS v3
- If you select vSAN, enter the following
- vSAN Architecture
- vSAN Datastore Name
Step 7 – Enter the Hosts configuration values:
- SSH Root Password
- FQDN for each of the management domain hosts
Note
You can add more than four (in VCF 5.2, you could only deploy four initial, resulting in needing to scale the management cluster later if you had more than four hosts
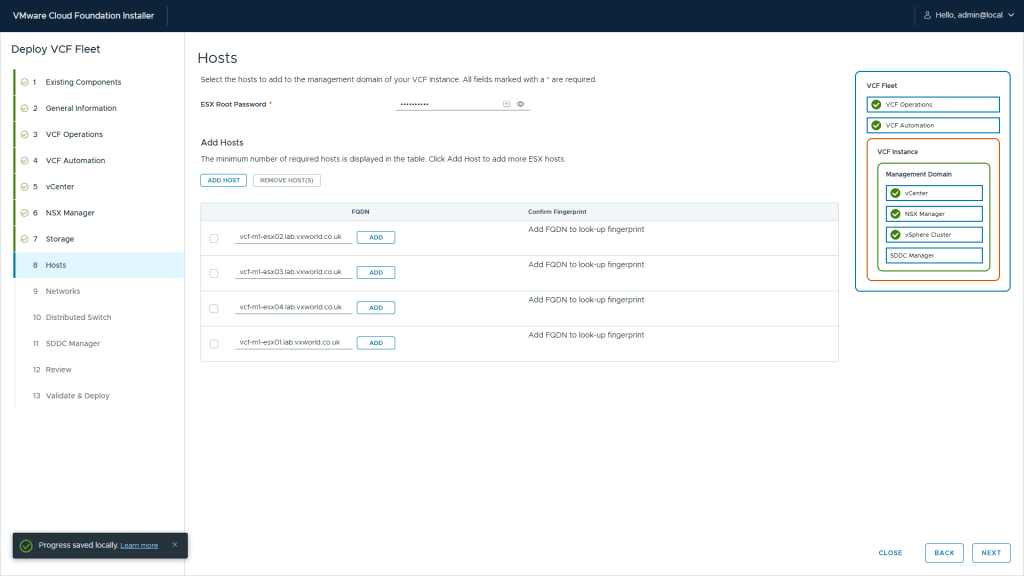
Step 8 – After adding the management hosts, click the add next to each host. After each fingerprints has been retrieved, click Confirm all fingerprints
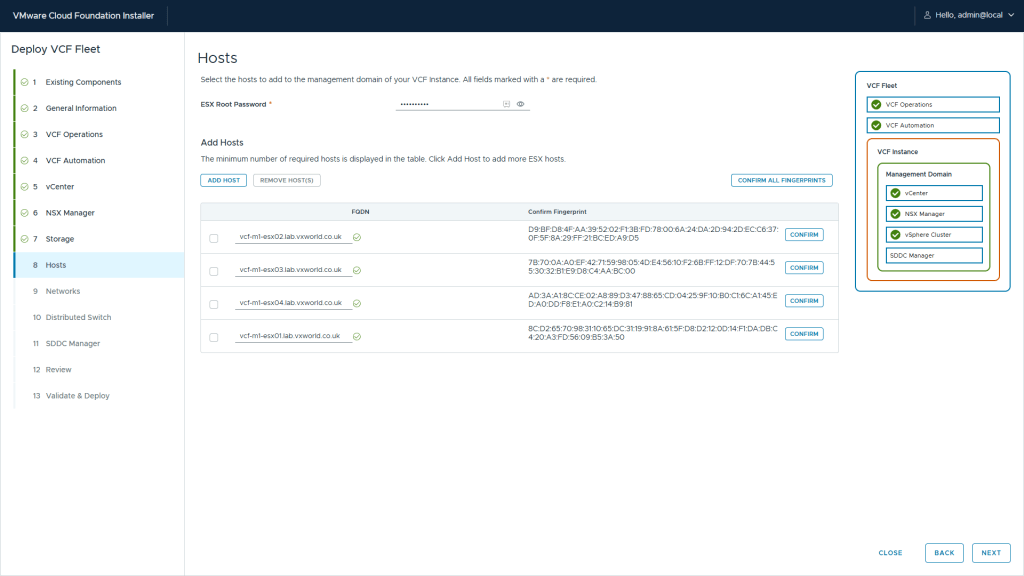
Step 9 – Once all fingerprints are confirmed, click Next

Tip:
If you get the error ‘javax.net.ssl.SSLPeerUnverifiedException: Certificate for FQDN doesn’t match any of the subject alternative names: [localhost.localdomain]’ you needed to regenerate the host certificate. This process is documented at the start of this post
Step 10 – Enter the Networks configuration values:
- ESXi Management Network
- VLAN ID
- CIDR Notation
- MTU
- Gateway
- VM Management Network
- Option to use same inputs as ESXi Management Network
- VLAN ID
- CIDR Notation
- MTU
- Gateway
- vMotion Network
- VLAN ID
- CIDR Notation
- Gateway
- MTU
- IP Address Range
- To (IP Address Range)
- vSAN Network
- VLAN ID
- CIDR Notation
- Gateway
- MTU
- IP Address Range
- To (IP Address Range)

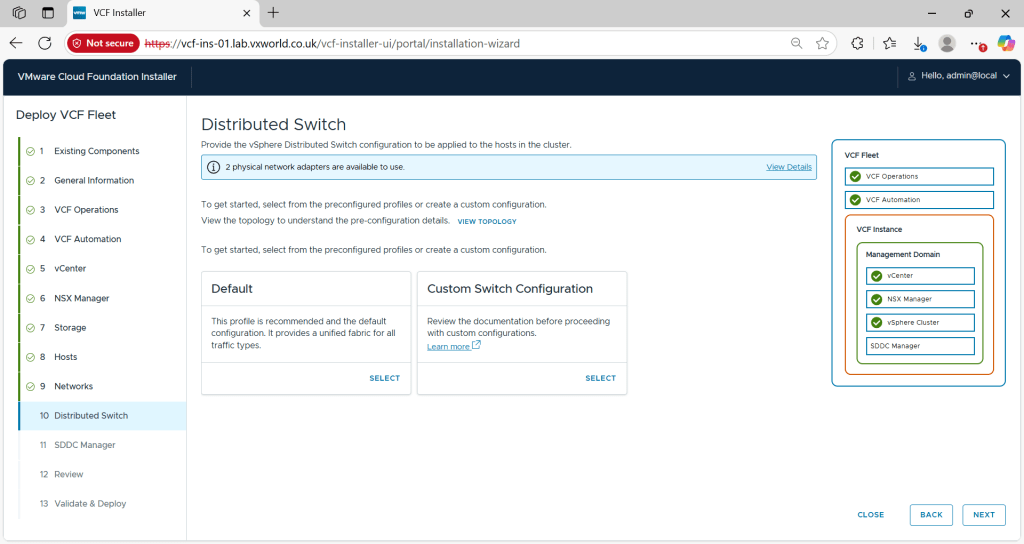
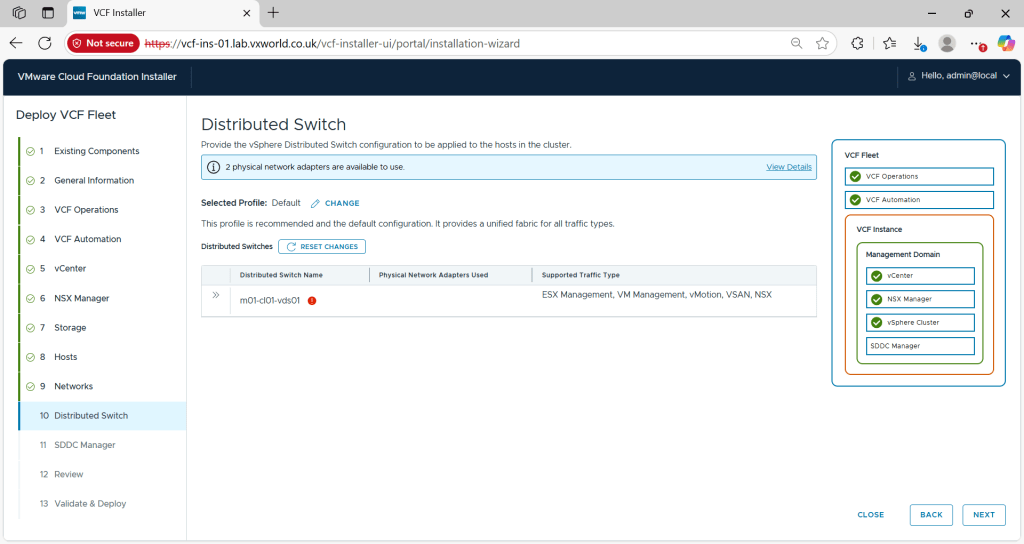
Step 11 – Now we need to configure the distributed switch. Depending on the number of network interface you host has, a number of typologies will be available. Click View Topologies if you want to explore your options or click Custom Switch Configuration.
Note: this screenshot was taken with only to pNICs, however the screenshots taken later, showing the typologies where at a time the host has four pNICs. That is why you only have Default and Custom Switch Configuration
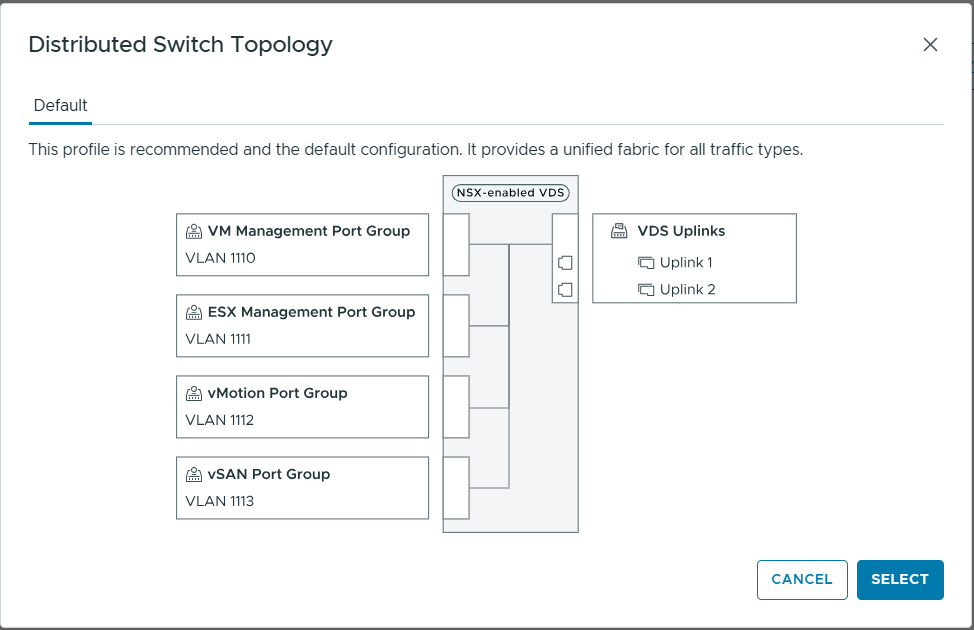
Below shows the Default distributed virtual switch typology.
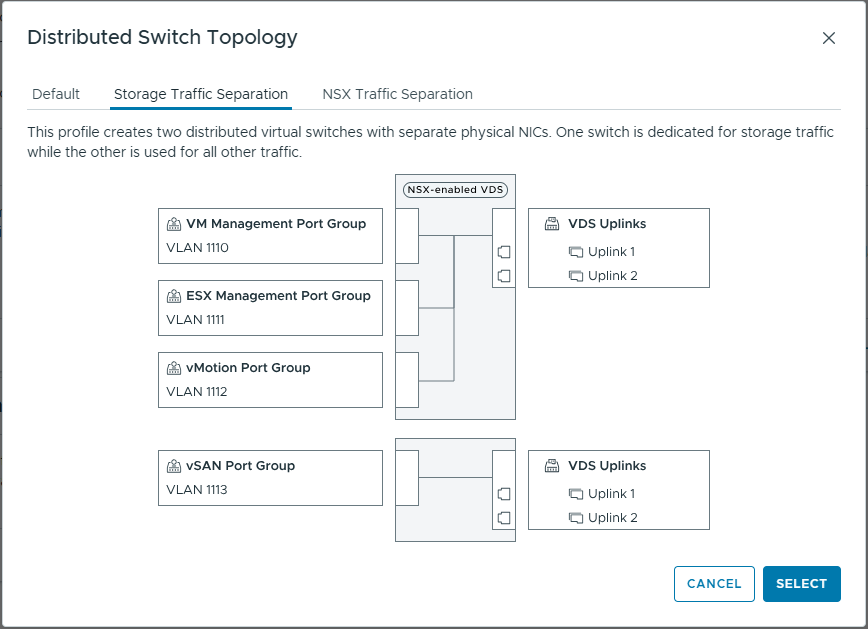
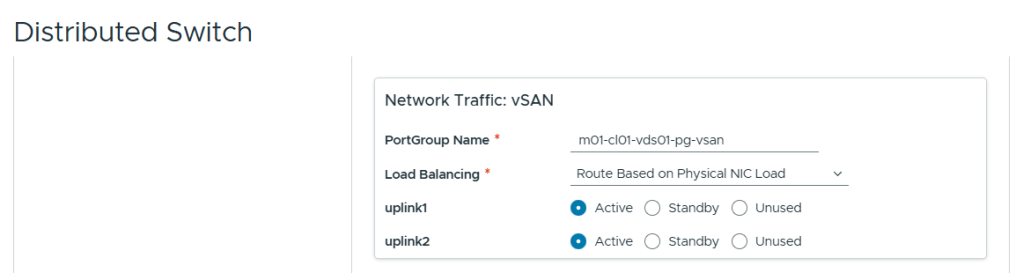
Below shows the distributed virtual switch typology where the Storage Traffic is segregated from the rest of the traffic.
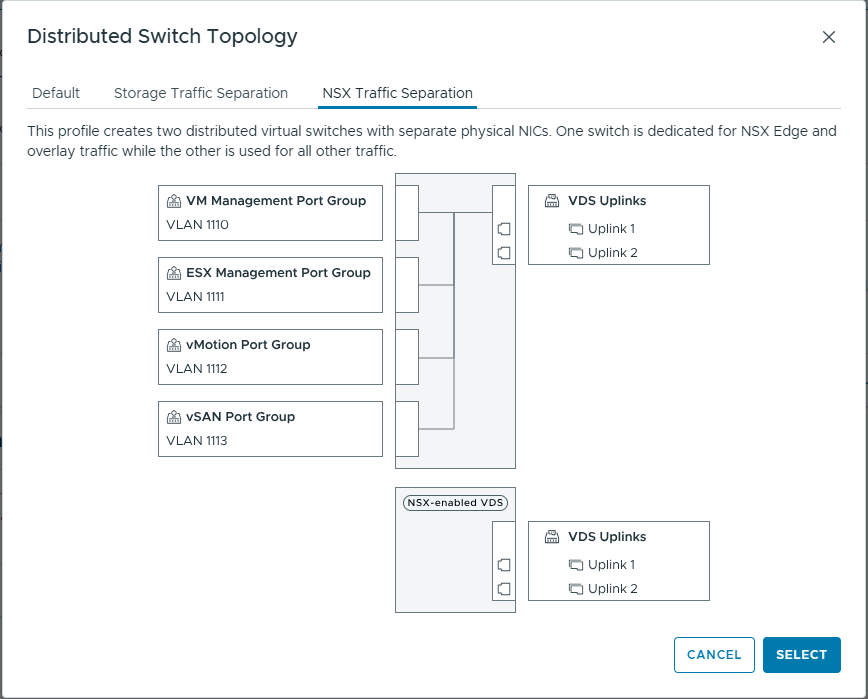
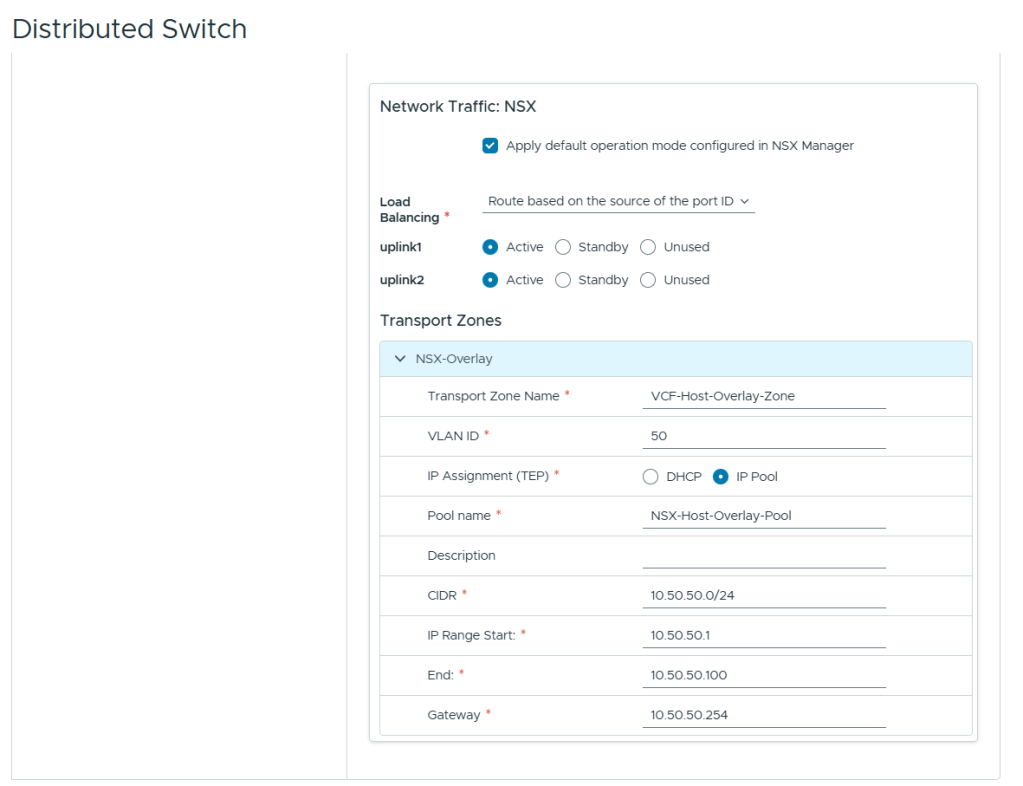
Below shows the distributed virtual switch typology where the NSX Traffic is segregated from the rest of the traffic.
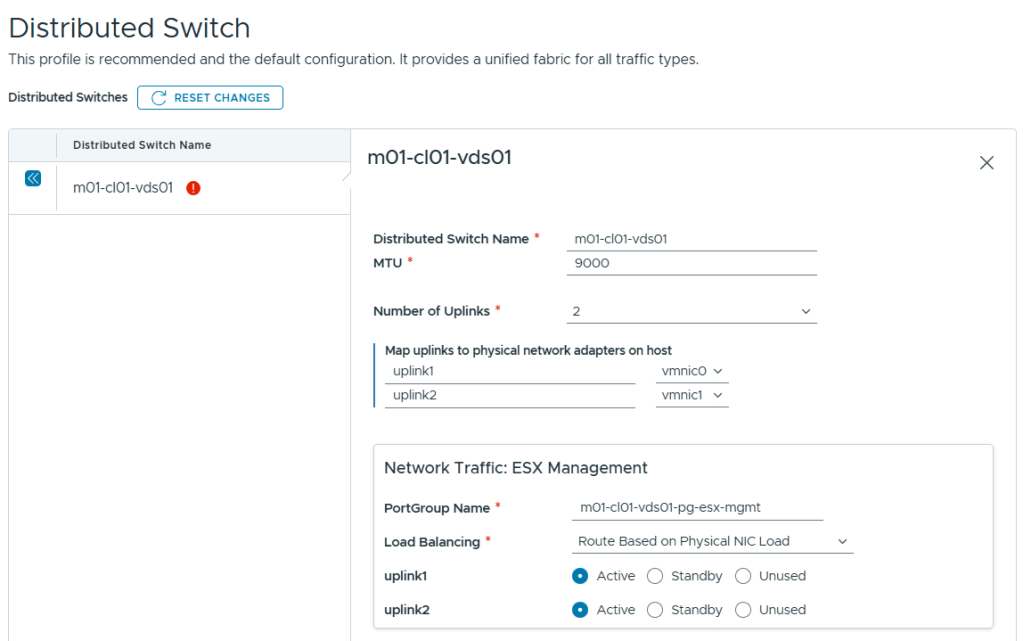
Step 12 – I selected the Default distributed virtual switch typology so it is now time to expand the vDS and configure the required properties

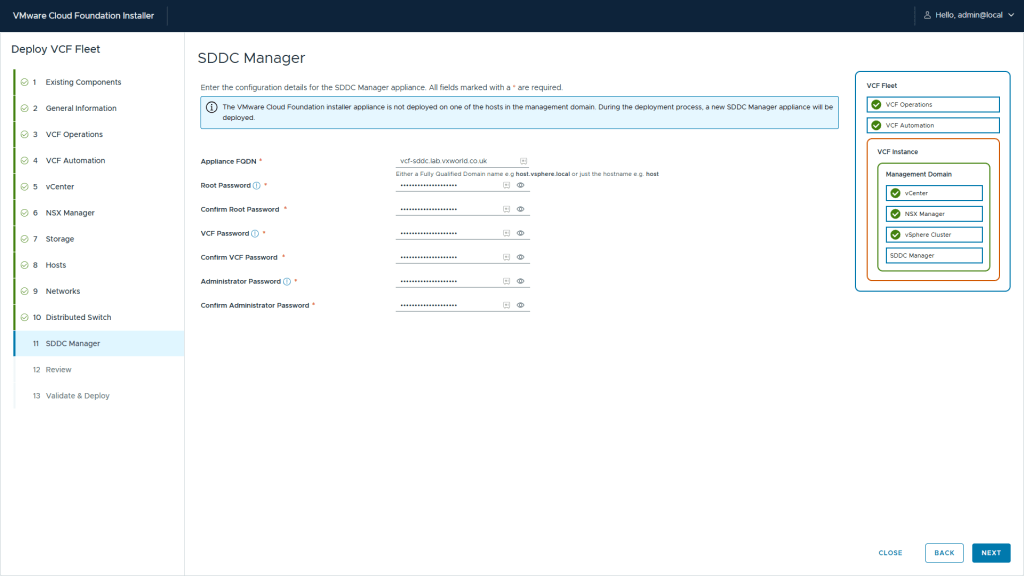
Step 13 – Enter the SDDC Manager configuration values:
- SDDC Manager Appliance FQDN
- Root Password
- VCF Password
- Administrator Password
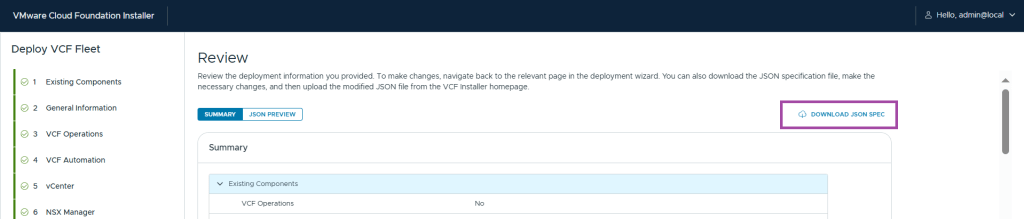
Step 14 – Download the JSON spec.
Tip
I recommend downloading the JSON as this will allow you to redeploy easily if for some reason you need to redeploy the VCF Installer appliance. It also serves as a useful reminder on your configuration
Waring: It saves all your credentials you entered in plain text
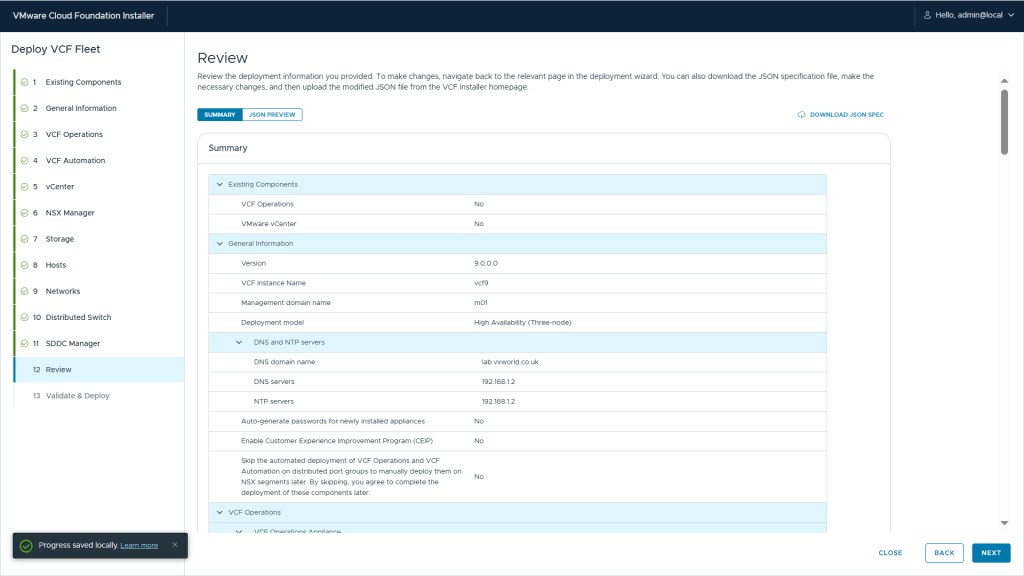
Step 15 – Review the configuration and click next to start the validation.
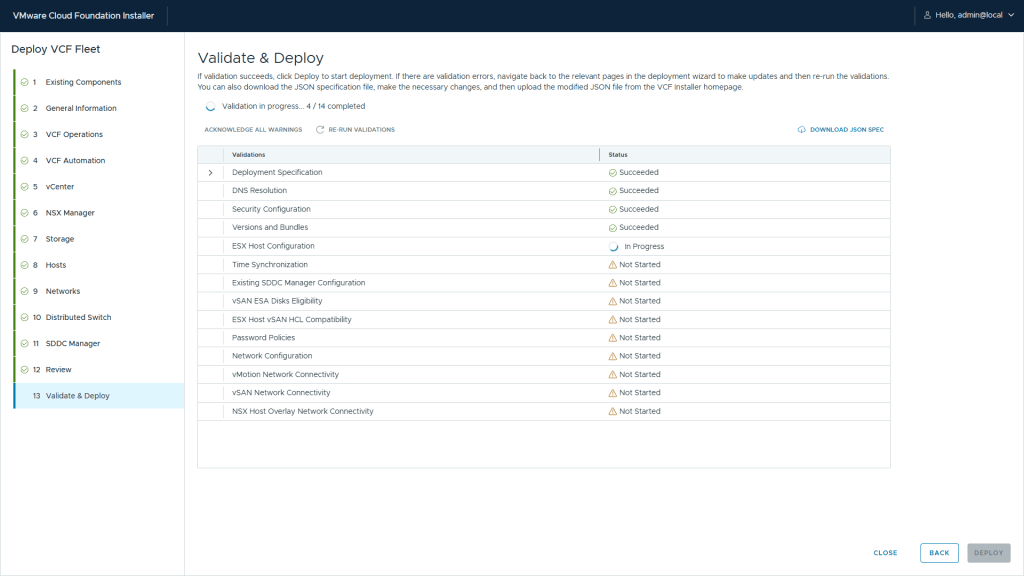
Step 16 – Wait for the validation to complete
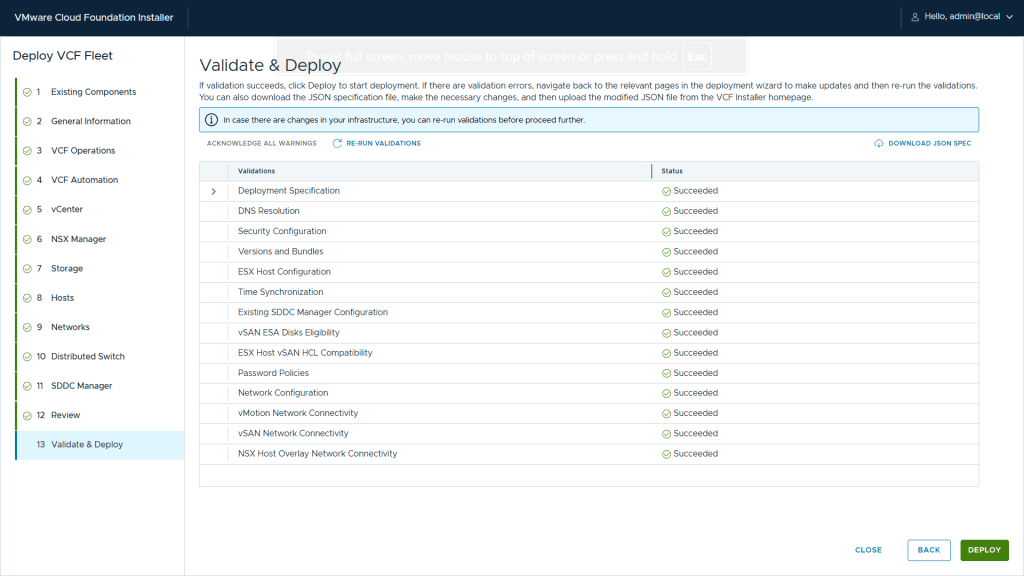
Step 17 – Once complete, click Deploy
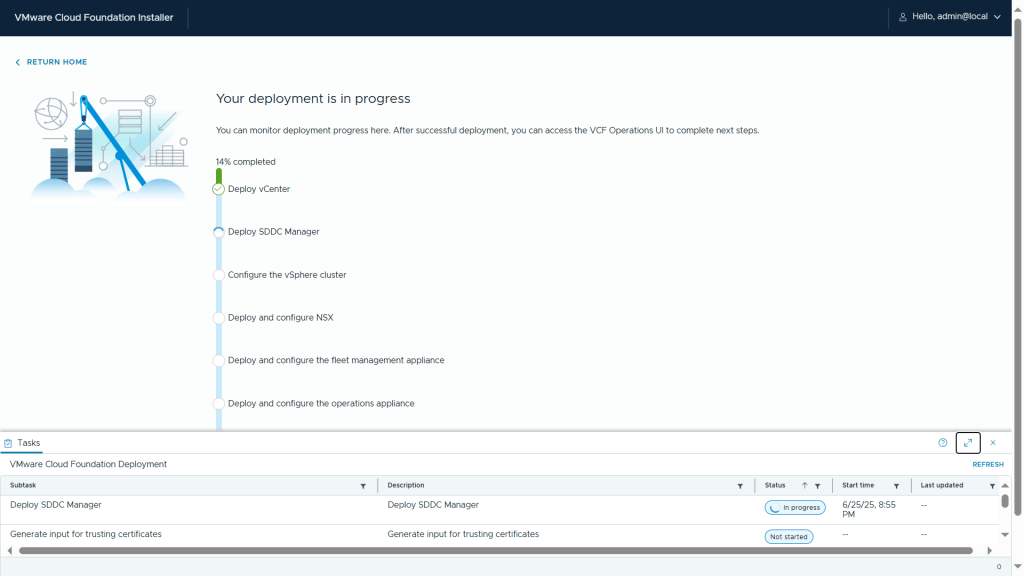
Step 18 – Monitor the deployment
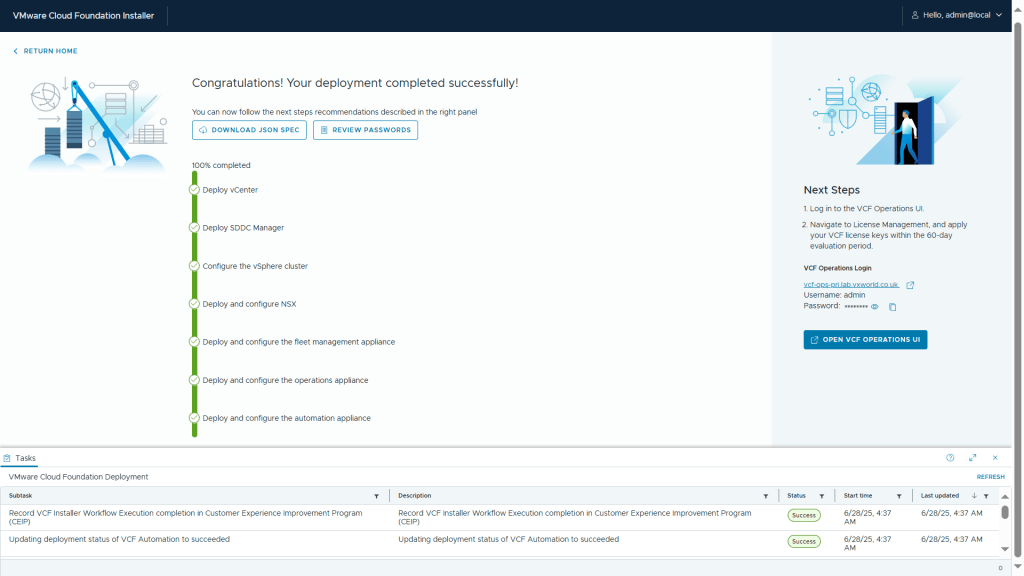
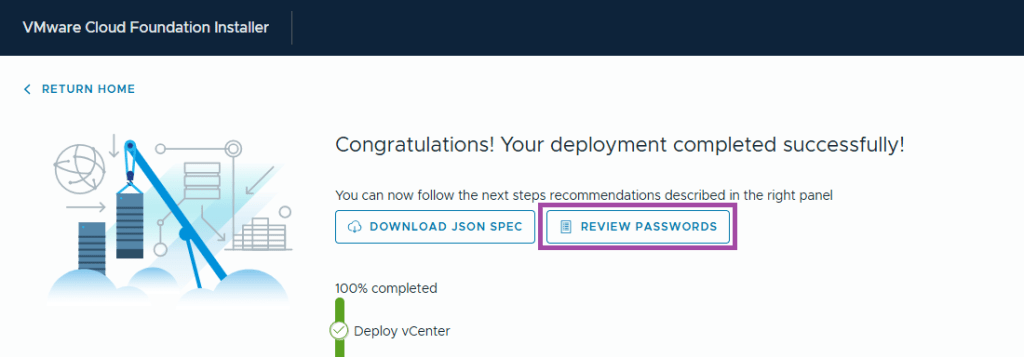
Step 18 – If you used the option during the installation to automatically generate the passwords, click Review Passwords and record them.
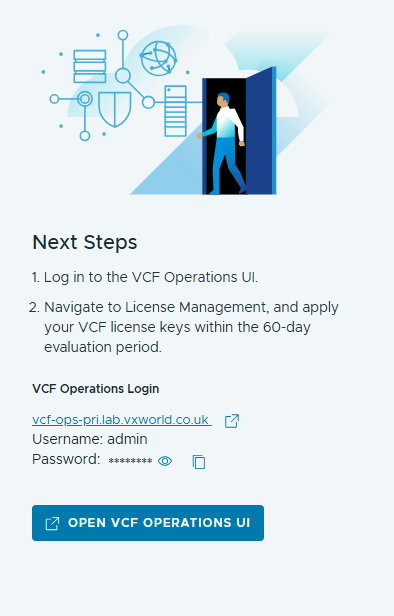
Step 19 – After the VCF 9 Installer completes the deployment, it provides a link to your primary VCF Operations Login URL.
That wraps up the VCF Installer walk-through. You’ve now seen how to deploy the appliance, manage binaries, and deploy your VCF Management Domain.
If you run into any issues during the process — check out the Troubleshooting section below.
JSON Format
Below is a copy of my saved JSON with the credentials and thumbprints removed.
Click to expand sample json
{
    "sddcId": "m01",
    "vcfInstanceName": "vcf9",
    "workflowType": "VCF",
    "version": "9.0.0.0",
    "ceipEnabled": false,
    "dnsSpec": {
        "nameservers": [
            "192.168.1.2"
        ],
        "subdomain": "lab.vxworld.co.uk"
    },
    "ntpServers": [
        "192.168.1.2"
    ],
    "vcenterSpec": {
        "vcenterHostname": "vcf-m1-vc01.lab.vxworld.co.uk",
        "rootVcenterPassword": "PasswordPlaceholder",
        "vmSize": "tiny",
        "storageSize": "",
        "adminUserSsoPassword": "PasswordPlaceholder",
        "ssoDomain": "vsphere.local",
        "useExistingDeployment": false
    },
    "clusterSpec": {
        "clusterName": "m01-cl01",
        "datacenterName": "m01-dc01"
    },
    "datastoreSpec": {
        "vsanSpec": {
            "esaConfig": {
                "enabled": true
            },
            "datastoreName": "m01-cl01-ds-vsan01"
        }
    },
    "nsxtSpec": {
        "nsxtManagerSize": "medium",
        "nsxtManagers": [
            {
                "hostname": "vcf-m1-nsx01.lab.vxworld.co.uk"
            },
            {
                "hostname": "vcf-m1-nsx02.lab.vxworld.co.uk"
            },
            {
                "hostname": "vcf-m1-nsx03.lab.vxworld.co.uk"
            }
        ],
        "vipFqdn": "vcf-m1-nsx.lab.vxworld.co.uk",
        "useExistingDeployment": false,
        "nsxtAdminPassword": "PasswordPlaceholder",
        "nsxtAuditPassword": "PasswordPlaceholder",
        "rootNsxtManagerPassword": "PasswordPlaceholder",
        "skipNsxOverlayOverManagementNetwork": true,
        "ipAddressPoolSpec": {
            "name": "NSX-Host-Overlay-Pool",
            "subnets": [
                {
                    "cidr": "10.50.50.0/24",
                    "gateway": "10.50.50.254",
                    "ipAddressPoolRanges": [
                        {
                            "start": "10.50.50.1",
                            "end": "10.50.50.100"
                        }
                    ]
                }
            ]
        },
        "transportVlanId": "50"
    },
    "vcfOperationsSpec": {
        "nodes": [
            {
                "hostname": "vcf-ops-pri.lab.vxworld.co.uk",
                "rootUserPassword": "PasswordPlaceholder",
                "type": "master"
            },
            {
                "hostname": "vcf-ops-rep.lab.vxworld.co.uk",
                "rootUserPassword": "PasswordPlaceholder",
                "type": "replica",
                "sslThumbprint": ""
            },
            {
                "hostname": "vcf-ops-data.lab.vxworld.co.uk",
                "type": "data",
                "rootUserPassword": "PasswordPlaceholder"
            }
        ],
        "adminUserPassword": "PasswordPlaceholder",
        "applianceSize": "medium",
        "useExistingDeployment": false,
        "loadBalancerFqdn": null
    },
    "vcfOperationsFleetManagementSpec": {
        "hostname": "vcf-fleet.lab.vxworld.co.uk",
        "rootUserPassword": "PasswordPlaceholder",
        "adminUserPassword": "PasswordPlaceholder",
        "useExistingDeployment": false
    },
    "vcfOperationsCollectorSpec": {
        "hostname": "vcf-ops-col.lab.vxworld.co.uk",
        "applicationSize": "small",
        "rootUserPassword": "PasswordPlaceholder",
        "useExistingDeployment": false
    },
    "vcfAutomationSpec": {
        "hostname": "vcf-portal.lab.vxworld.co.uk",
        "adminUserPassword": "PasswordPlaceholder",
        "ipPool": [
            "10.50.10.105",
            "10.50.10.106",
            "10.50.10.107",
            "10.50.10.108"
        ],
        "nodePrefix": "vcf-auto",
        "internalClusterCidr": "198.18.0.0/15",
        "useExistingDeployment": false
    },
    "hostSpecs": [
        {
            "hostname": "vcf-m1-esx02.lab.vxworld.co.uk",
            "credentials": {
                "username": "root",
                "password": "PasswordPlaceholder"
            },
            "sslThumbprint": "Placeholder"
        },
        {
            "hostname": "vcf-m1-esx03.lab.vxworld.co.uk",
            "credentials": {
                "username": "root",
                "password": "PasswordPlaceholder"
            },
            "sslThumbprint": "Placeholder"
        },
        {
            "hostname": "vcf-m1-esx04.lab.vxworld.co.uk",
            "credentials": {
                "username": "root",
                "password": "PasswordPlaceholder"
            },
            "sslThumbprint": "Placeholder"
        },
        {
            "hostname": "vcf-m1-esx01.lab.vxworld.co.uk",
            "credentials": {
                "username": "root",
                "password": "PasswordPlaceholder"
            },
            "sslThumbprint": "Placeholder"
        }
    ],
    "networkSpecs": [
        {
            "networkType": "MANAGEMENT",
            "subnet": "10.50.10.0/24",
            "gateway": "10.50.10.254",
            "subnetMask": null,
            "includeIpAddress": null,
            "includeIpAddressRanges": null,
            "vlanId": "10",
            "mtu": "1500",
            "teamingPolicy": "loadbalance_loadbased",
            "activeUplinks": [
                "uplink1",
                "uplink2"
            ],
            "standbyUplinks": null,
            "portGroupKey": "m01-cl01-vds01-pg-esx-mgmt"
        },
        {
            "networkType": "VM_MANAGEMENT",
            "subnet": "10.50.10.0/24",
            "gateway": "10.50.10.254",
            "subnetMask": null,
            "includeIpAddress": null,
            "includeIpAddressRanges": null,
            "vlanId": "10",
            "mtu": "1500",
            "teamingPolicy": "loadbalance_loadbased",
            "activeUplinks": [
                "uplink1",
                "uplink2"
            ],
            "standbyUplinks": null,
            "portGroupKey": "m01-cl01-vds01-pg-vm-mgmt"
        },
        {
            "networkType": "VMOTION",
            "subnet": "10.50.30.0/24",
            "gateway": "10.50.30.254",
            "subnetMask": null,
            "includeIpAddress": null,
            "includeIpAddressRanges": [
                {
                    "startIpAddress": "10.50.30.1",
                    "endIpAddress": "10.50.30.100"
                }
            ],
            "vlanId": "30",
            "mtu": 9000,
            "teamingPolicy": "loadbalance_loadbased",
            "activeUplinks": [
                "uplink1",
                "uplink2"
            ],
            "standbyUplinks": null,
            "portGroupKey": "m01-cl01-vds01-pg-vmotion"
        },
        {
            "networkType": "VSAN",
            "subnet": "10.50.20.0/24",
            "gateway": "10.50.20.254",
            "subnetMask": null,
            "includeIpAddress": null,
            "includeIpAddressRanges": [
                {
                    "startIpAddress": "10.50.20.1",
                    "endIpAddress": "10.50.20.100"
                }
            ],
            "vlanId": "20",
            "mtu": 9000,
            "teamingPolicy": "loadbalance_loadbased",
            "activeUplinks": [
                "uplink1",
                "uplink2"
            ],
            "standbyUplinks": null,
            "portGroupKey": "m01-cl01-vds01-pg-vsan"
        }
    ],
    "dvsSpecs": [
        {
            "dvsName": "m01-cl01-vds01",
            "networks": [
                "MANAGEMENT",
                "VM_MANAGEMENT",
                "VMOTION",
                "VSAN"
            ],
            "mtu": 9000,
            "nsxtSwitchConfig": {
                "transportZones": [
                    {
                        "transportType": "OVERLAY",
                        "name": "VCF-Host-Overlay-Zone"
                    }
                ]
            },
            "vmnicsToUplinks": [
                {
                    "id": "vmnic0",
                    "uplink": "uplink1"
                },
                {
                    "id": "vmnic1",
                    "uplink": "uplink2"
                }
            ],
            "nsxTeamings": [
                {
                    "policy": "LOADBALANCE_SRCID",
                    "activeUplinks": [
                        "uplink1",
                        "uplink2"
                    ],
                    "standByUplinks": []
                }
            ],
            "lagSpecs": null
        }
    ],
    "sddcManagerSpec": {
        "hostname": "vcf-sddc.lab.vxworld.co.uk",
        "useExistingDeployment": false,
        "rootPassword": "PasswordPlaceholder",
        "sshPassword": "PasswordPlaceholder",
        "localUserPassword": "PasswordPlaceholder"
    }
}
Troubleshooting
Log Files
If you experience validation or deployment failures, check the log files for the domain manager service on the VCF Installer appliance.
cat /var/log/vmware/vcf/domainmanager/domainmanager.log
If you experience issues with VCF Operations or VCF Automation, check the log files on the VCF Operations fleet management appliance.
/var/log/vrlcm/vmware_vrlcm.log
Failed ‘Migrate ESXi Host Management vmknic(s) to vSphere Distributed Switch’
If the during deployment, the configure the vSphere cluster stage, sub step Migrate ESXi Host Management vmknic(s) to vSphere Distributed Switch fails. Check your network configuration of your parent host/cluster.
After some troubleshooting (than it should have been as Erik had already documented this issue – VCF 9.0 Nested Lab Deployment – vmk0) I worked out it was not working with MAC Learning, I revered my vDS config on my parent lab cluster and enabled Promiscuous mode and Forged Transmit – disabling Mac Learning
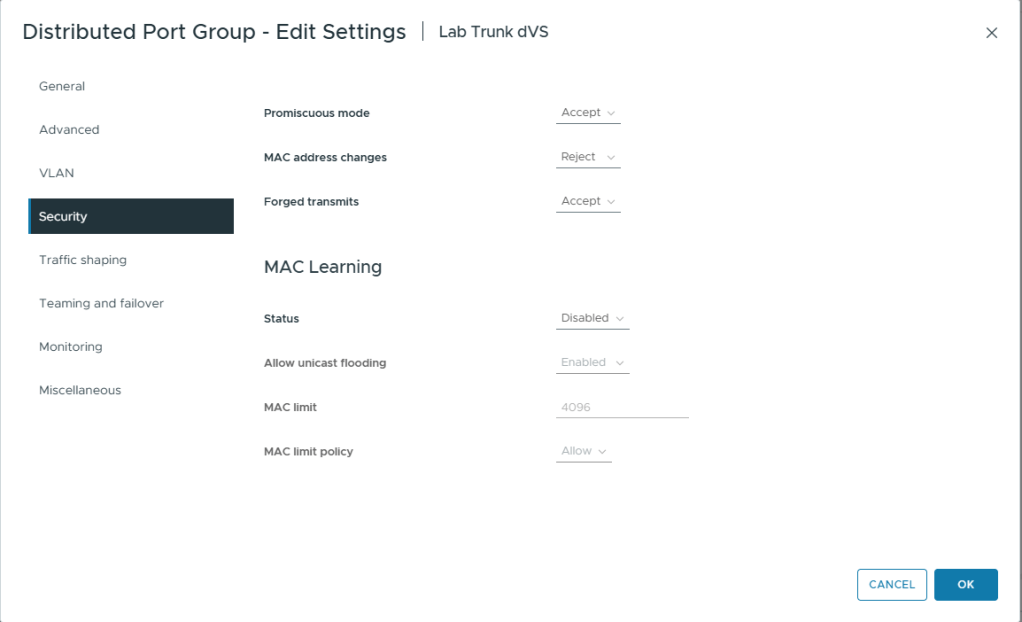
Tip
After deployment, for performance reasons, I reverted back to Forged Transmits and Mac Learning (disabling Promiscuous mode)
Credits
Shoutout to
- Erik and his blog VMware Cloud Foundation 9.0 Nested Lab Deployment | blog.graa.dev
- Daniel Krieger aka SDN warrior – His MAC Learning is your friend post was very insightful (noting it does not currently work with the VCF Installer)
- William Lab and his blog https://williamlam.com/


Leave a comment