In this post, we’ll walk through the step-by-step process of deploying of the vSAN Witness Appliance for my Homelab’s 2-node vSAN cluster.
Before we dive into the deployment, let’s quickly recap how a 2-node vSAN cluster works. Unlike larger vSAN clusters that require a minimum of three vSAN nodes, a 2-node configuration uses RAID 1 mirroring to replicate data between the two hosts. However, to maintain quorum and ensure data availability during a host failure, vSAN requires a third component — the vSAN Witness Appliance. The witness acts as a tie-breaker, providing the additional vote needed to maintain quorum when one of the hosts goes offline.
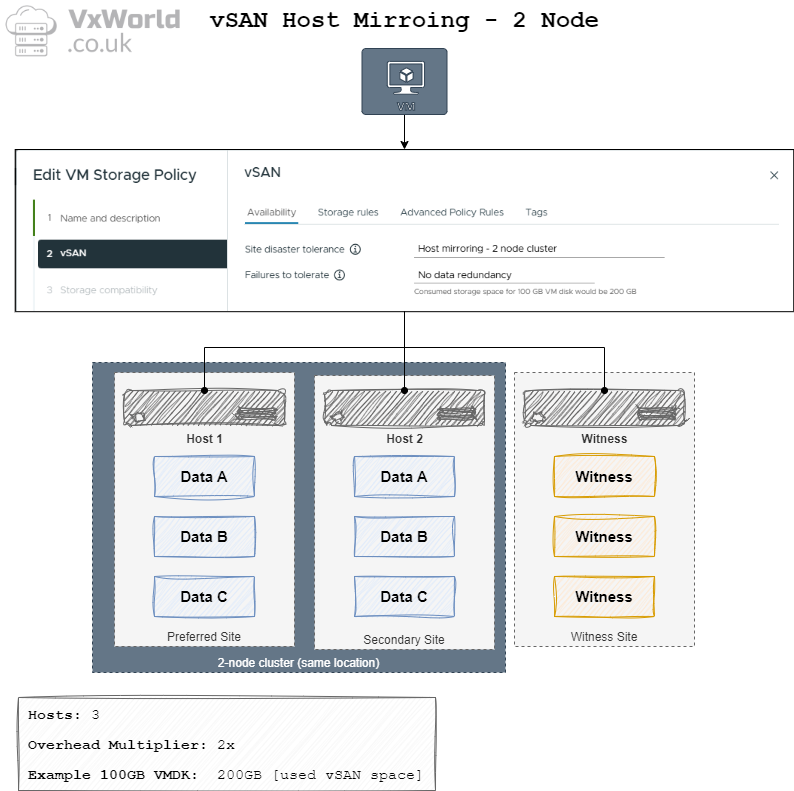
When you deploy a 2-node cluster, it is similar to a vSAN stretched cluster, so you will notice some of the terminology used makes more sense for a stretched cluster. For example, each node is referred to as a Site, resulting in Primary and Secondary sites (fault domains) despite them both being physically at the same site. A 2-node cluster can provide two levels of Failures to Tolerate (FTT):
- Site Disaster Tolerance (also known as Primary Failures to Tolerate) – Controls data replication (e.g., mirroring) across the two hosts, where each host is considered a site.
- Failures to Tolerate (also known as Secondary Failures to Tolerate, and within the context of a 2- node cluster, known as nested fault domains) – Controls the number of failures to tolerate within a host.
In this series of posts, when we get to storage policies, I will only be using Site Disaster Tolerance, as to use Failures to Tolerate would require more disks than I have in my lab (a minimum of 3 for ESA or OSA in each host).
The diagram below depicts how the data and witness components are distributed when using a 2-node vSAN cluster.
TIP
If you want more details on vSAN Storage Polices, check out Data placement with vSAN Storage Policies
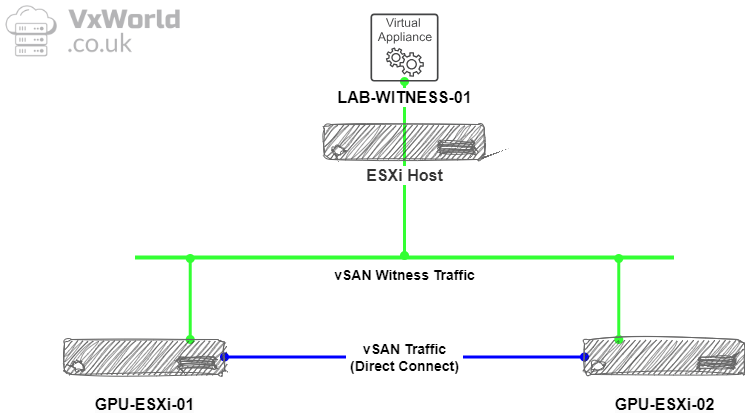
To contextualise where the witness sits, this should be in a different location to the two hosts. In my lab, they are all within the same place, but for production, if the 2-node cluster was in a branch office, the witness would be in the main datacentre. I will be using vSAN Direct Connect, resulting in vSAN traffic using two 10Gbps links in a LACP bond directly connected between the two hosts – removing the need to 10Gbps or greater infrastructure. The witness traffic will travel over the management network to the witness appliance.
The diagram below depicts how the traffic flows between the members of the 2-node vSAN cluster.

Now, let’s get started with the deployment process.
This has been split out into the following sections:
- Step 1 – Download vSAN Witness Appliance OVA
- Step 2 – Create DNS Address for vSAN Witness
- Step 3 – Deploying vSAN Witness
- Step 4 – Setting the root password
- Summary
- References
Step 1 – Download vSAN Witness Appliance OVA
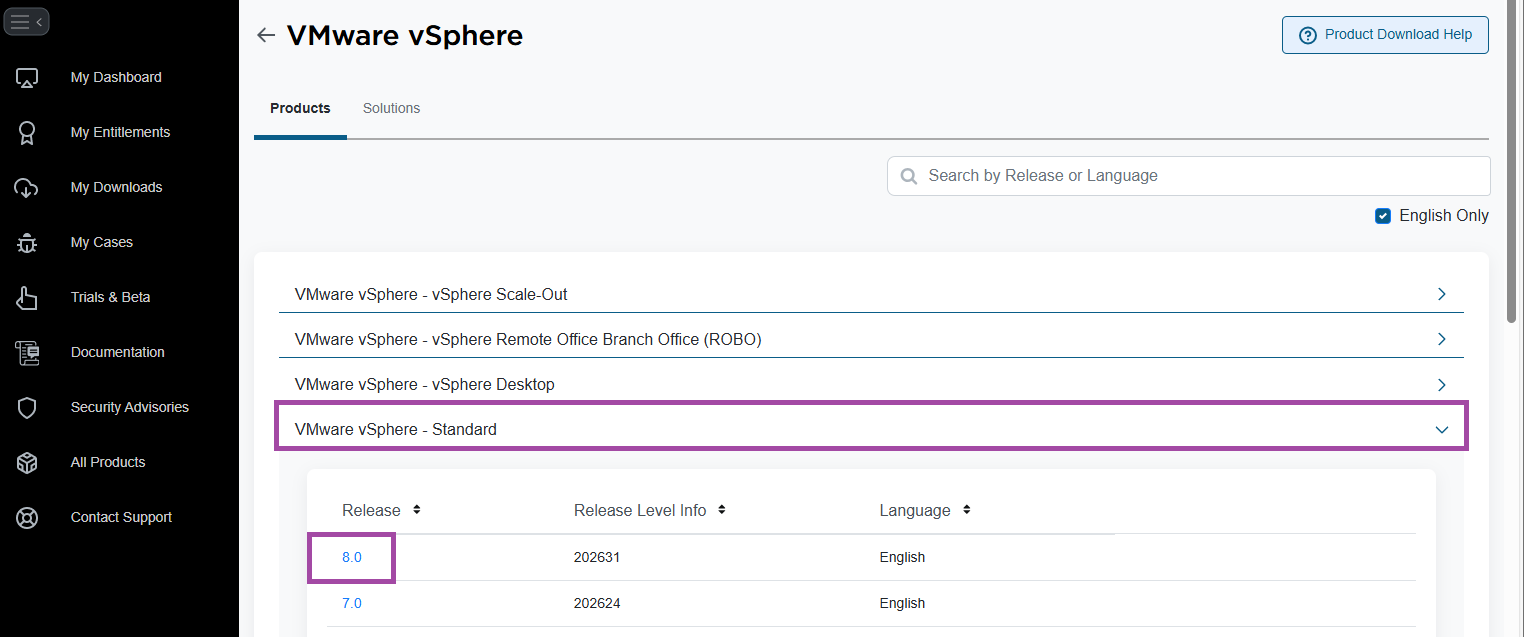
To download the appliance, I followed Broadcom’s institutions at Download location of vSAN Witness Appliance and File Service Appliance. Below is taken from that process, with screenshots added.
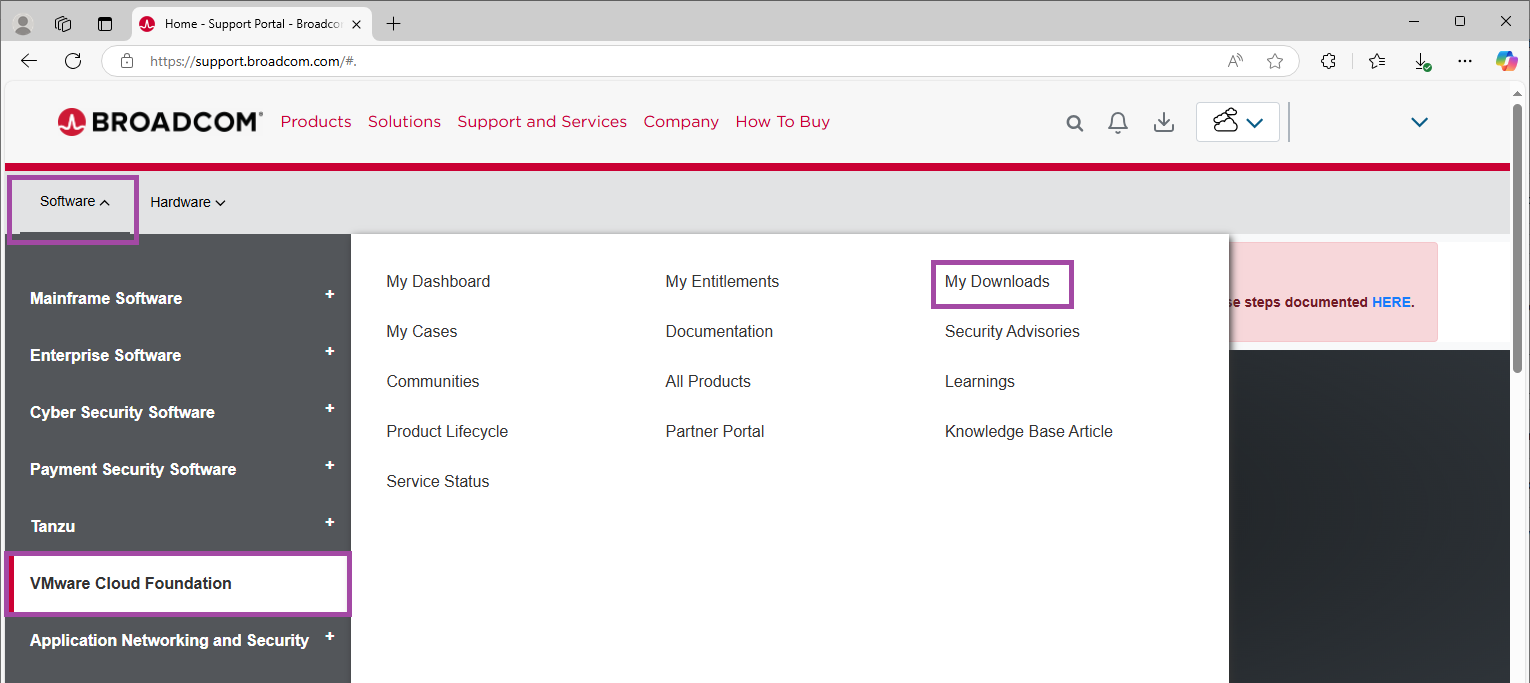
- Go to the Broadcom support portal
- Sign in
- From Software -> VMware Cloud Foundation, click on My Downloads
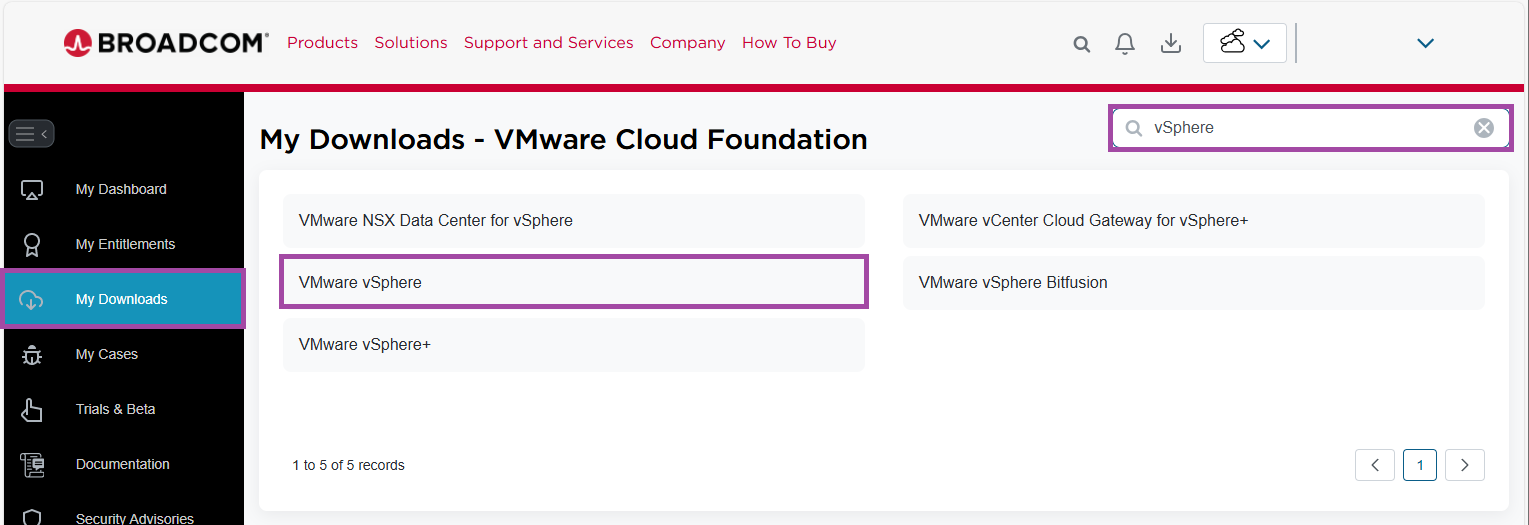
- In the Search box, enter vSphere
- Click on VMware vSphere
- Click on VMware vSphere – Standard
- Click on the appropriate release version. In my example, 8.0
- On the top, go to Drivers & Tools
- Type vSAN Witness in the search box
- Choose either OSA and ESA as appropriate for the vSAN cluster. In my example, I am download the ESA witness
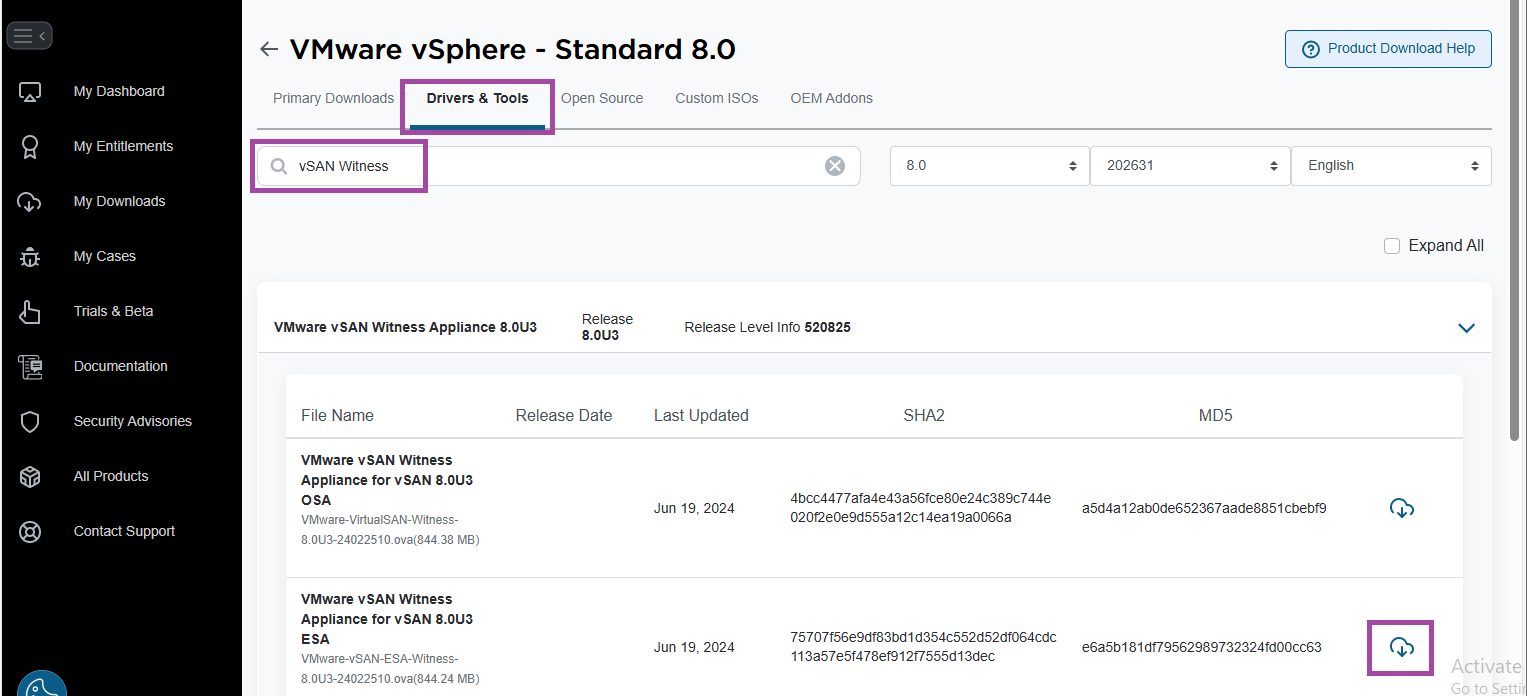
- You should now have an OVA downloaded, ready to deploy to an ESXi host
Step 2 – Create DNS Address for vSAN Witness
Before deploying the witness, ensure you have created the A and PRT records.
If you are following this Lab build, follow the steps below. If you have your own DNS server, create the required A and PRT records for the witness FQDN.
- Log onto the Domain Controller created in VMware GPU Homelab: Part 4 – Building a Windows Domain Controller and DNS server
- Open an elevated PowerShell window
- Run the command below to create the DNS A and PRT record for the vSAN Witness. Note: substitute the Name, ZoneName and IPv4Address values that I am using in my Homelab for your own
Add-DnsServerResourceRecordA -Name "lab-witness-01" -ZoneName "lab.vxworld.co.uk" -IPv4Address "192.168.1.100" -CreatePtrStep 3 – Deploying vSAN Witness
It’s now time to deploy the vSAN Witness. Since it cannot reside on the same cluster it is providing witness functionality for, I will deploy the vSAN Witness on an existing ESXi host. This host is a low-powered Intel NUC.
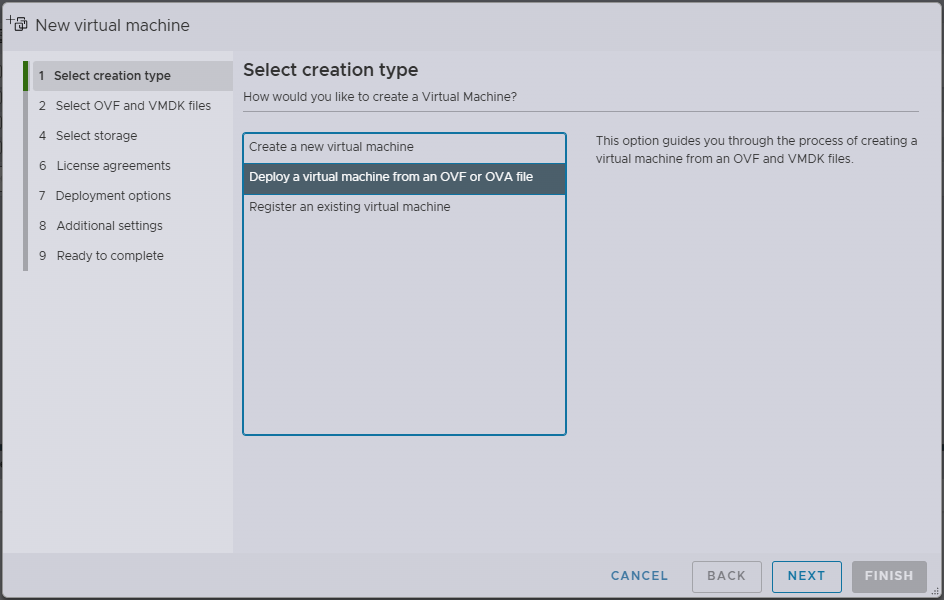
- Connect to the ESXi Host Client
- Under Virtual Machines, click Create / Register VM
- Select Deploy a virtual machine from an OVF or OVA file
- Click Next
- Enter the VM Name for the vSAN witness appliance
- Click in the blue box and select the vSAN Witness ova you downloaded earlier
- Click Next

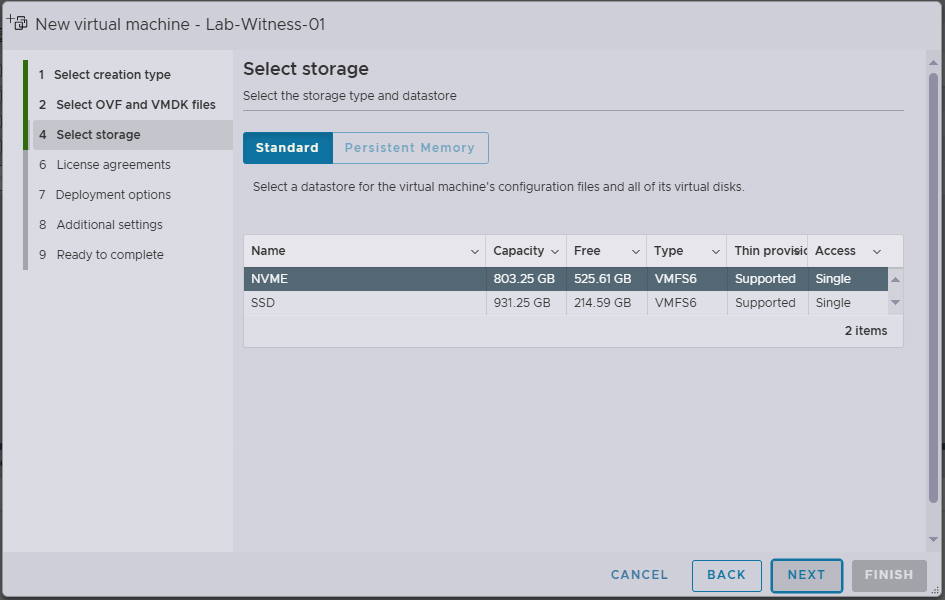
- Select the Datastore
- Click Next
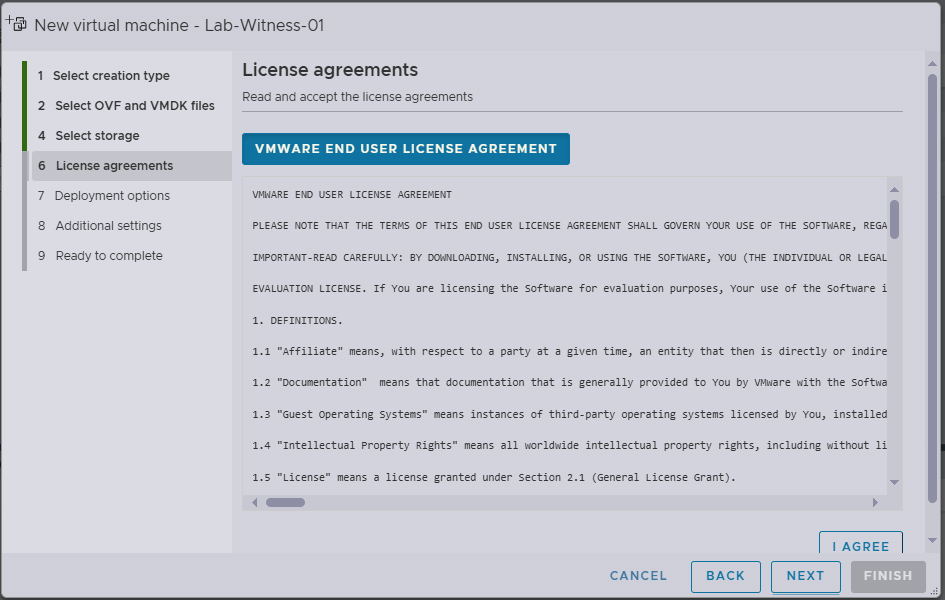
- Review the Licence agreement, if you are happy to accept, click I Agree
- Click Next
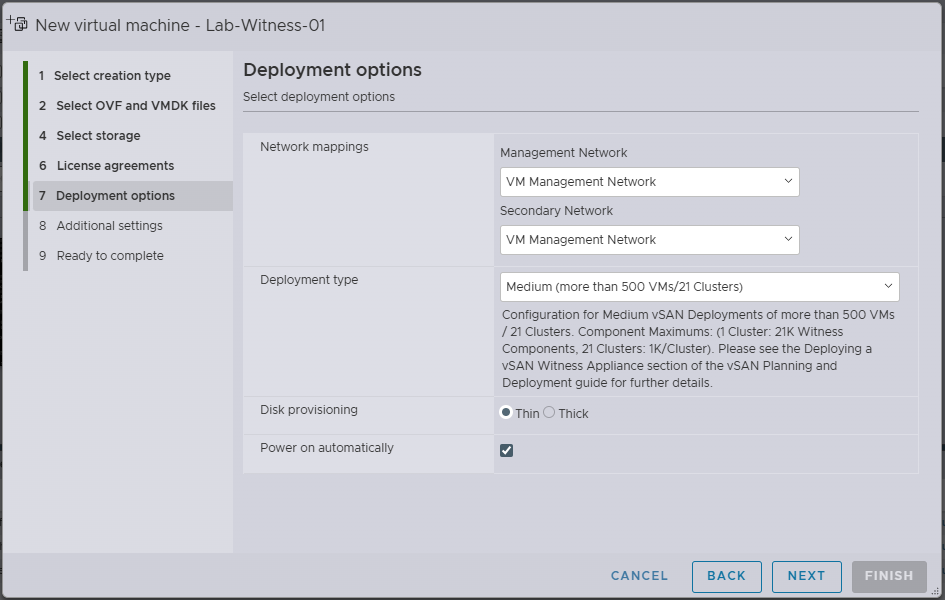
- Under Network Mappings
- Management Network: VM Management Network (see note below)
- Secondary Network: VM Management Network (see note below)
- Under Deployment type, I am selecting Medium for my Homelab (this is the smallest size)
- Under Disk provisioning, I am selecting Thin for my Homelab
- Check Power on automatically
NOTE
The Management Network and Secondary Network enable the separation of management and vSAN traffic for the witness appliance. This configuration is particularly beneficial when the witness resides at a different site from the cluster, allowing management access on one subnet while isolating vSAN witness traffic on another.
In my lab setup, I have two hosts directly connected for vSAN. These hosts will utilise their management interface (vmk0), which is connected to the VM Management Network to communicate with the witness. Given this configuration, the Secondary Network is not required in my lab environment. However, since there is no option to leave the Secondary Network disconnected, I will connect it to the same network as the Management Network.
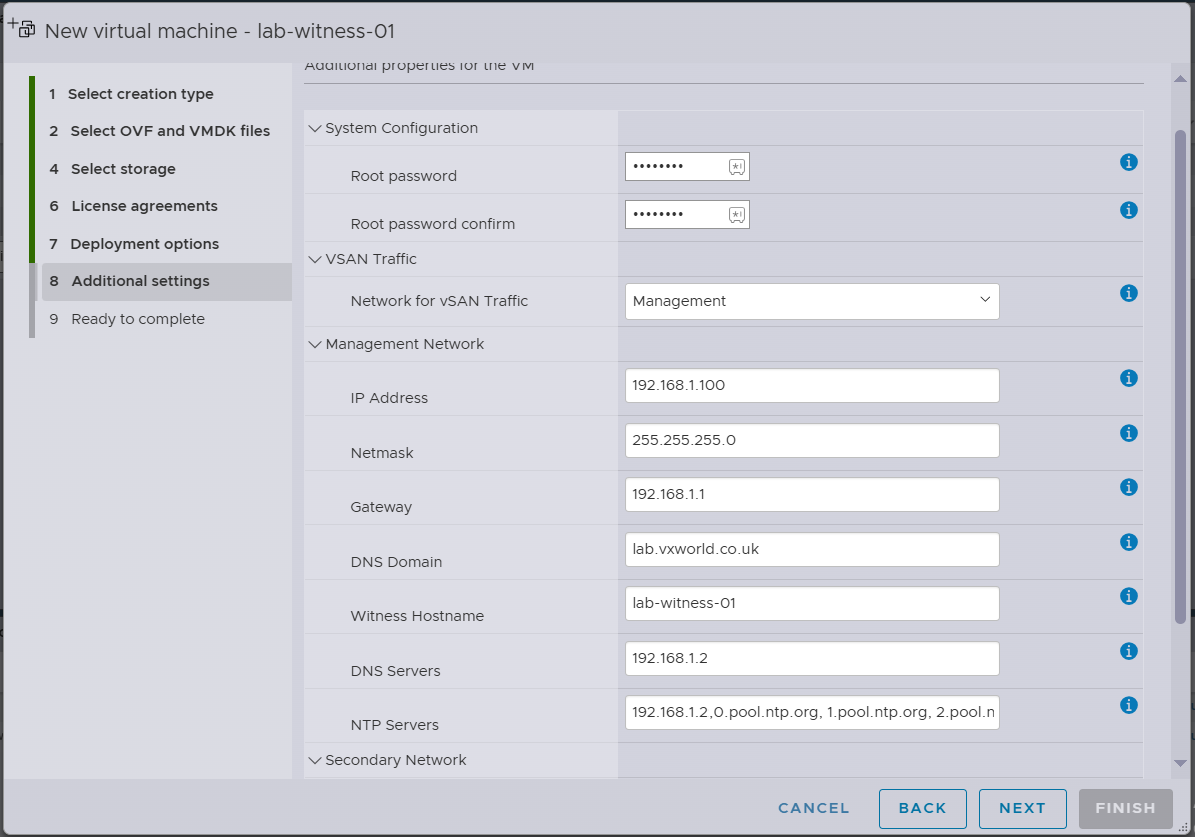
- Under Addtional Settings
- Set the Root password for the vSAN Witness appliance (see troubleshooting below)
- Select the Network for vSAN Traffic (as noted above, I will be using the Management network)
- Enter the Management Network details. Note for the NTP Servers: due to this being a Homelab, In addition to the NTP server running on my DC, I will add public internet NTP servers. This is because when the lab is shutdown, the witness will time drift from the hosts that are powered of (DC runs on these hosts). A time drift of greater than 5 seconds will cause ‘reboot_helper.py recover’ to fail. The additional NTP servers I am using are: 0.pool.ntp.org, 1.pool.ntp.org, 2.pool.ntp.org, 3.pool.ntp.org as they are the same ones the DC syncs with
- Click Next
Troubleshooting Password Error post vSAN Witness OVA Deployment
When deploying the OVA, hover over the (i) icon to review the password requirements for the root user. If the specified password does not meet these requirements, the VM will deploy but fail to boot with the following error:
“The password supplied does not meet the password policy requirements.”
Even though my password satisfied the stated requirements (uppercase, lowercase, number, and special character), I consistently encountered this error. After troubleshooting, I suspect there is a bug in the OVA deployment process when the password exceeds a certain length. While the exact length limit is unclear, I successfully deployed the VM using an 8-character password.
To work around this issue, use a shorter password during deployment. Once the VM is deployed, you can change the password to your preferred one via the Direct User Console Interface (DUCI) or ESXi Host Client as you would on any standard ESXi host.
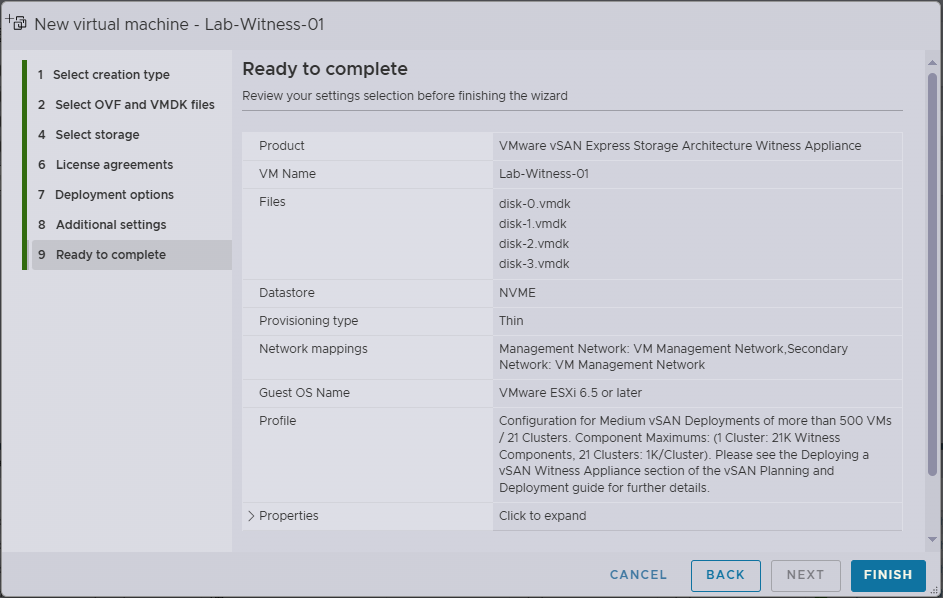
- Review the selected options on the Ready to complete screen, if happy, click Finish
- After successful deployment, you should see the DCUI as pictured below. If you receive the The password supplied does not meet the password policy requirements error, see my note above.

- You should now be able to browse to the ESXi Host Client via the DNS name or IP address
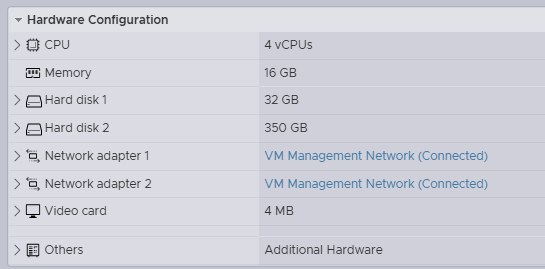
Note: The spec of the deployed Medium size, Tiny storage ESA witness is as follows.
Step 4 – Setting the root password
During deployment, I was unable to set the root password to my desired one due to a possible bug in the OVA deployment. Now the ESXi Host Client is accessible, I will update it to my preferred password.
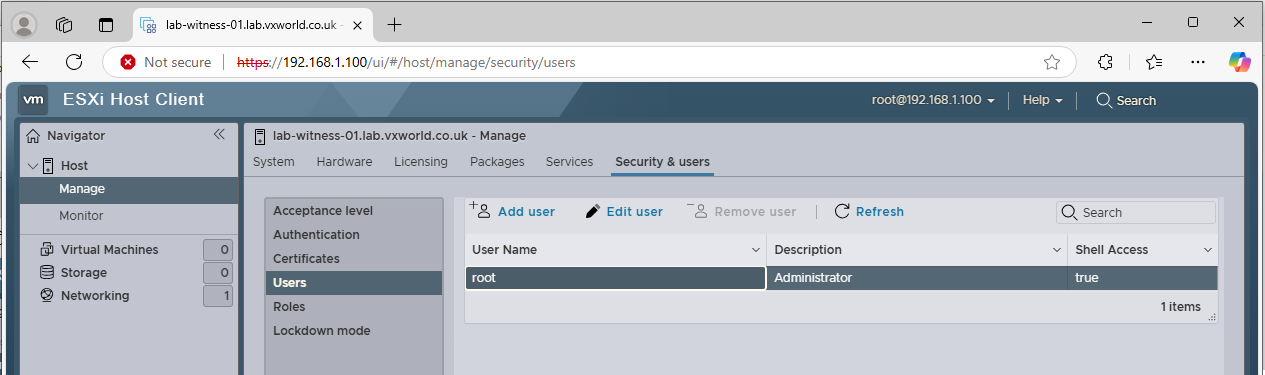
- Browse to the vSAN Witness’s ESXi Host Client
- Enter the root user and password to login
- Browse to, Host -> Manage -> Security & Users
- Click Users on the left
- Select the root user
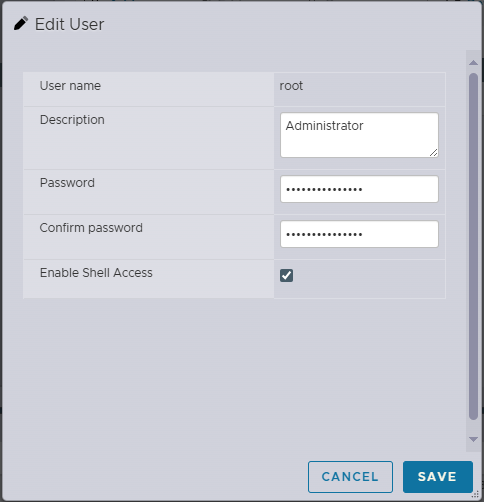
- Click Edit User
- Enter the new Password and again in the Confirm Password field
- Click Save
Summary
Deploying a 2-node vSAN cluster with a witness appliance is an effective solution for ROBO or edge environments where maintaining a full vSAN cluster isn’t feasible or is more than required. While my homelab setup places all components in the same location, this design mimics a real-world branch office deployment where the witness resides in a central data centre. By leveraging vSAN Direct Connect for high-speed vSAN traffic and routing witness communication over the management network, this setup ensures fast vSAN and vMotion data paths while reducing costs since 10/25Gbps switching is not required.
If you want more details on vSAN Storage Polices, check out Data placement with vSAN Storage Policies
Head over to my next post in the series, VMware GPU Homelab: Part 7 – Configuring a Two-Node vSAN Cluster: Step-by-Step Guide where I configure networking, add the second host and the witness to the cluster, and perform some final configuration before diving into the GPU side of things.


Leave a comment